Fried Chicken Secret Spices!


It is very common to find copycat recipes online these days, and there are scores of posts that say they have the "exact" recipe for that famous Colonel's fried chicken. I doubt that, especially since the ingredients vary from post to post! Don't believe everything you read!

I've had a fried chicken spice recipe for many years and the originator claimed it was the "real thing" from the Colonel. I'm sure it isn't but it sure is a good one! I  combine these spices: 

A teaspoon of each:

Poultry seasoning
Pepper
Salt
Onion powder
Garlic powder
Cinnamon
Celery salt

2 Tablespoons:
Paprika
Accent

I store these combined spices in a jar and when I'm oven frying or pan frying chicken, I use a teaspoon of the spices to every half cup of flour. You can sprinkle more on each piece of chicken before you bake it or after you remove it from your skillet.  I soak my chicken pieces in buttermilk for about 30 minutes, then dredge the pieces in the seasoned flour.  I prefer to oven fry chicken these days, so I place each piece in a shallow pan that has about 1/4 to a 1/2 cup of canola oil in it. If you want more seasoning, sprinkle it on at this point. Bake the chicken at 350 degrees for about an hour. Turn the pieces over after 30 minutes, so both sides brown. You can turn the pieces more frequently, if you want to brown it all the way around (like the legs).  It is possible that it will take a little longer than an hour to finish the chicken, especially if the pieces are larger. I cut chicken breasts into 4 pieces, but the thighs might take a few more minutes to get done.

My mother made oven fried chicken and we call it "Boyfriend Chicken" because she made it as a special meal with our boyfriends or girlfriends came to visit! Mother turned her chicken every 15 minutes and sprinkled each piece with Lawry's Seasoning Salt. Instead of using oil, she melted a stick of butter in her baking pan. I still make this, too ... and it is delicious, too!


Greens with Outlander!


It seems fitting that I'm reading the Outlander books this summer ... and experiencing all kinds of recipes with greens! Every time I try a new recipe, I think of Claire and all her medicinal concoctions using herbs and greens and things that she foraged. I'm loving the books and since my daughter is way ahead of me in reading them, occasionally I can get her to give me hints about what will be happening!  

This week's greens from the CSA are sorrel. It isn't often that I say I haven't eaten something, but until today, I had never knowingly tasted sorrel. I say 'knowingly' because my grandparents and a pair of elderly neighbors used to cook all kinds of pots of greens ... so it is possible that I've eaten them in childhood!

I am delighted by the flavor. They taste like a combination of Granny Smith tart apples, lemons and limes. The leaves that I cooked were about four inches long and I chopped the stems right with the leaf. After a little study, I found that folks love them in salads, cooked as pot greens and used in sauces. Because of the tart flavor, they are especially good served in sauces made with butter and cream and accompanying fatty fish like salmon. The tart flavor cuts the richness of the fatty ingredients. I also found that sorrel with ripen and burst a boil if you make the leaves into a poultice!

I might try that, but tonight I had my sorrel in a cream sauce over pasta, and here it is!


This recipe is enough for two servings of pasta or four side servings of pasta.

In 2 Tablespoons of butter, saute 2 Tablespoons of finely chopped sweet onion. When the onions are beginning to soften, add 2 cups of loosely packed sorrel leaves cut in a chiffonade style. As soon as the greens wilt, add 1/2 cup of dry white wine, 1 cup of half and half and 1/2 cup dry parmesan cheese. Add a dash of salt and a grind of black pepper and let this simmer until the sauce thickens ... about 4 - 6 minutes. When the sauce is done, add 1/2 cup chopped tomato (no juice or seeds) and stir it into the sauce.

I served this over penne pasta ... so the sauce would seep into the center of the noodles!  Loved it! 

This sauce resembles a Florentine sauce, but the flavor is different ... not so "icky" rich because the sorrel indeed cuts that out. It will be delicious served over any kind of meat, used as a sauce for crepes or stacked in a flour tortilla casserole with shredded chicken. 

I'll be sharing this with a few of the parties listed in my sidebar, but I hope you'll hang around my home page to see my other posts!

Lots of Basil!


Phoebe convinced me to move all my planters filled with herbs to the front yard this spring. She was just working on our "chair garden" and wanted to fill the spot with as much as we could! She had no idea that the sun would be better in the front. Our shade trees have gotten so huge in the back yard ... we don't have enough sun in my old planting spots! Wow! Do we ever have an abundance of basil ... two kinds .. cinnamon and Italian sweet basil. So, I'm clipping and freezing and today I decided to make a batch of pesto and a little vinegar with some of the purple cinnamon basil flowers.

My pesto recipe isn't anything special ... I made tons of it when I owned an Italian restaurant, so I just throw it together now ... 35 years later!  I had a colander full of basil leaves, so I threw them into the food processor with a cup of walnuts pieces and another cup of parmesean cheese. After chopping it, I slowly added olive oil until it reached the consistency I wanted.  I store my pesto in a jar in the refrigerator, but you can also freeze small portions of it if you like. It doesn't last long at my house, so no need to freeze it! I can always make more!


I'll post some of the ways I use pesto in upcoming weeks, but here is one simple way to make a flavorful focaccia-style appetizer or bread to accompany a meal. This is actually angel biscuit dough! Blogging friends usually email me and ask me what I do with all the angel biscuit dough when I make it ... here is one way to use it ... and pizza crust is another way. I simply spread a chunk of the dough on an oiled sheet and slathered the top with the pesto. 
I baked it at 350 degrees for about 10 minutes.  Doesn't take too long!

I'll be posting this wit ha couple of the parties on my sidebar, but make sure you stick around my home page to see my other posts ... before moving on! If you'd like to see Phoebe's "chair garden" just click through right here!

If you need a recipe for Angel Biscuits, it is included in this post.

To see our Monster Pizza made with this dough, check this out!


Monster Pizza!


I have a batch of Angel Biscuit dough in the fridge and one of my favorite things to make with it is pizza!  Phoebe and I made a little monster pizza for our lunch one day this week and here's how easy it was!

We just plopped a hunk of the dough on an oiled baking sheet and pushed it into a misshaped form! That makes it look like a monster.  The sauce is a package of my homemade pasta sauce that I froze awhile ago. I use enough ground beef, onions and peppers in it that you don't have to add anything else for topping. Then we added lots of mozzarella cheese, so it would be all gooey when it was done.  Bake this at 350 degrees for about twelve minutes. It doesn't take it long to get nice and brown.

You'll find a recipe for Angel Biscuit Dough in this post ... and you can visit my homemade pasta sauce post right here!


Celebrate with Chocolate Hazelnut Marble Cake!


I remember the first time I ate a piece of chocolate marble cake. I was too young to go to school and I was at a neighbor's house ... not a neighbor who would normally have helped my mom out by babysitting, so there must have been a reason why I was not staying with the folks who would normally have helped! Don't know ... but I know that she had a beautiful chocolate frosted cake sitting on the kitchen counter when I got there and wow, there was nobody there but me to eat it! I was the baby child of five and my mother baked beautiful cakes and pies, but they were quickly devoured by the hungry horde! When she cut that cake and I saw that, by some kind of magic, it was both yellow and chocolate, my mouth watered! When I returned home and told my mother all about the cake, she said ... "Oh, that is from a box mix" ... like it was nothing special! Mother baked everything from scratch, at the time! That changed!


Let me tell you how easy this Chocolate Hazelnut Marble Cake is to make. Use a box mix of white cake! Mix it following the directions and pour two-thirds of the batter into your prepared cake pan. To the remaining third of cake batter, add a big scoop of chocolate hazelnut spread ... and thoroughly blend it together. Pour the chocolate mix over the white and use a knife to swirl it around. There you have it! My hazelnut spread included chopped hazelnuts, but I threw in a handful of chopped pecans, too.  This cake is so good, it sure doesn't need any frosting, but I added some of the spread to the center of my sunflower shaped bundt cake. It was delicious and makes a really good celebration cake!

I'll be sharing this with a couple of the parties listed in my sidebar, but make sure you visit my home page to see some of my other posts!

Happy Fourth of July!


Buttermilk Pie


Who doesn't love a piece of pie!  This easy recipe is one of my favorites for summertime because it can be dressed up with the fresh fruit of the season, but here it is in its naked beauty!  This recipe uses Bisquick and makes its own crust, so it is about as easy and quick to make as blinking your eyes!

BISQUICK BUTTERMILK PIE

1 cup sugar
1/2 cup Bisquick or any other Baking Mix
1 cup buttermilk
1/3 up butter or margarine, melted 
1 teaspoon vanilla, almond or coconut extract 
3 eggs

Mix all the ingredients together in a food processor or blender. Pour into a sprayed pie plate and bake at 350 degrees for 40 minutes.

You can add other things to the ingredients to make the pie a little different. Sprinkle the top with cinnamon ... or stir in a cup of shredded coconut.  Use brown sugar instead of granulated sugar to make a Caramel Buttermilk Pie ... sprinkle the top of it with chopped nuts.  

Serve it with a dollop of whipped cream and surround each piece with sliced fresh peaches or berries. Drizzle a little caramel or chocolate syrup over it ... or serve it with a little canned cherry pie filling.  Anything goes!

I'll be sharing this post with a couple of the parties listed in my sidebar. Make sure you stick around my home page, though. You might find something else you like!


Tandori Pork Steak


Years ago I had a friend from India who introduced me to the flavors of the foods she had grown up eating! Comparing her very flavorful spice combinations to potato salad and baked beans was areal hoot! She convinced me that there was more to grilled meat than thick tomato based barbecue sauce!

What I've learned since, especially with regard to Tandori, is that everybody has their own rendition of the recipes! I've developed my own, as well. I mix equal portions of cumin, paprika, garlic powder, dry mustard and coriander together. Make what you need for a few pieces of meat ... or make a container full to store. I rubbed these pork steaks with a little bit of olive oil, then generously seasoned them with my spice mixture. In addition to the dry spices, I chopped plenty of cinnamon basil to sprinkle on them. Grill the meat over medium heat until their juices run clear. The amount of time depends on the thickness of the steaks. These took about 8 minutes on each side.

I served my pork steaks with sesame peanut slaw and small new potatoes that I had boiled first ... then tossed in olive oil and finished on the grill.

Enjoy!


Flounder with Bacon & Lemon Sauce


When my family first started vacationing oceanside in South Carolina, it was still nearly impossible to buy fresh ocean fish in the rural Midwest! Yes! That many years ago! The first time I tasted flounder was in a restaurant in Charleston, SC and I fell in love. The next day, I dashed to the seafood market to buy flounder fillets so I could replicate the recipe in the tiny kitchen of our hotel suite! I've been making this recipe for years and I never grow tired of the simple flavors.


For each flounder fillet, use 1 strip of bacon. Chop the bacon and gently fry it with an equal portion of chopped onion. When the bacon is done, transfer it to a plate. In the remaining bacon grease, pan fry the fish ... after you've dredged it in either corn meal or corn flour. I usually serve a wilted salad with this fish, so while the fillets are frying, clean the greens and drain them. When the fish is done, transfer it to a warm platter and put the bacon and onions back in the skillet. If no bacon grease remains in the skillet, add a Tablespoon of canola oil. Add a teaspoon of sugar, a grind of pepper and the juice of a lemon (1/4 cup).  Let this simmer for a minute or two, then pour it over the fish. Quickly throw the greens into the same skillet and let them wilt. There will be enough sauce remaining in the skillet to coat the greens. This is a simple recipe and takes about 30 minutes to prepare. I've served it at dinner parties and received high praise!


Every time I use these plates in a post, somebody asks what they are! They are Pfaltzgraff, Sedona pattern ... and they are called picnic plates. I'm not sure they still make them, but we love ours!

I'll be sharing this post with a few parties listed in my sidebar. I always encourage my blog friends to stick around my home page for a little while, though. You might find something else you like!

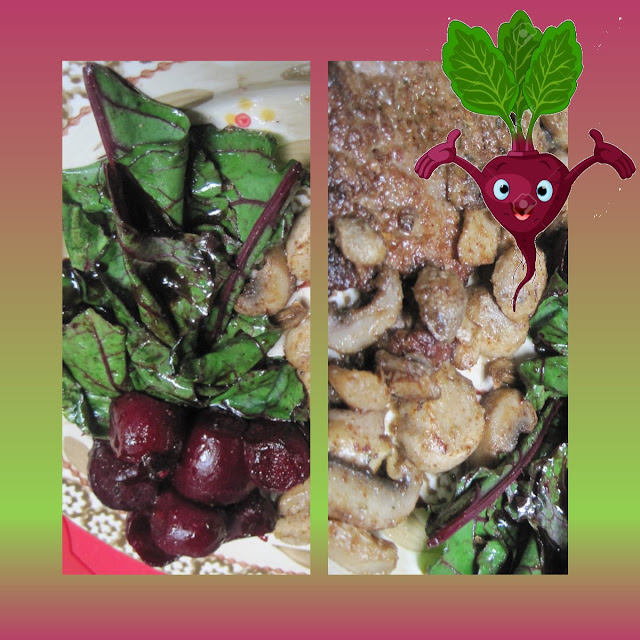
Beets - Beautiful & Delicious!


I'm really enjoying my CSA bag this summer! It is the first time we've had access to a Community Supported Ag project in our little college town ... and it is the college students who have launched it. It is delightful to see them each week, but more delightful to see what secret ingredients are in my bag! 

This past week the bag contained the prettiest little beets! I'm sure I don't have to tell you how healthy beets are ... and I love them!


I also love beet greens and most people I know have never even tasted them. I trimmed the tops from the beets and wrapped them in foil ... baked them at 350 degrees for about 40 minutes. They were tiny. When they are done, all you have to do is run them under cold water and the peels skin right off when they are that small. I had quickly fried a beef minute steak in just a tiny bit of olive oil, then sauteed a handful of mushrooms to go along with it. I threw a few beet greens right in that empty skillet while it was still hot and tossed them around in the mist of oil that was left, added the whole beets to the skillet ... heated everything through and drizzled a little Balsamic reduction sauce on them.


I love to cook, but I don't spend much time in the kitchen when it is hot. If it cannot be cooked outside on the grill, it gets cooked in less than thirty minutes in the kitchen! I'm a big fan of minute steaks, pork and beef, and dust them with just a little bit of flour and seasonings before I quickly sear them in a skillet. I keep lots of spice combinations on hand and this time I used my favorite Mexican spices ... a little Mexican oregano, chipotle powder and cumin.

Be sure you eat your beets ... I'm sharing this post with a couple parties listed on my side bar, but stick around my home page before you click through! Hope you are enjoying the beginning of summertime!


Oceanside Family Room


Our family room needed a little freshening for summertime.  Living in the Midwest far from the oceans, we always made Myrtle Beach our vacation spot.  I don't plan to go there this summer, but decided it might be fun to transform a few spots in my house into perfect reminders! The red beach chair was the inspiration for all this activity!


I've had this cute red miniature beach chair for several years. You've probably seen it on tablescapes in the past! This summer it will hold two of my patriotic friends who will keep watch over all the fun Miss Phoebe and I plan to have! She is anxiously awaiting a big vacation to Orange Beach, Alabama ... complete with cousins and aunts and uncles! The whole young extended family rented a big beach house! It is a good thing that the "planning and anticipating" are important parts of vacations ... because she sure is doing that ... between dips in the pool!


That great sofa pillow is actually an outdoor pillow, but two of them found their way inside! MeMutt doesn't care what kind of sofa pillows we have ... as long as he gets to lounge with them!


One of the first things I did was swap out this light weight red rug for the wooly thick wintery rug I typically have here. That brightened up everything quickly!

Then I added a few touches to the coffee table! Seashell napkins because we have plenty of snacks around that table! The baskets remind me of my Charleston seagrass baskets which are displayed in another part of the house! The candle is sitting in a pretty dish I bought this summer at Kirkland's. I grabbed it because it had RED coral in it. Have to have red at my house!


The miniature red beach chair landed on the sofa table with a white lantern. I filled the lantern with battery operated white lights for fun ... and I still have some of my mini scrapbooks on display. I am loving that new hobby and am just about ready to start making Christmas albums, which I plan to sell!


The vignette on top of this wooden cabinet is a combination of a few things. The anchor, crock and sign came from Kirkland's. The Black Labrador at the beach print came from Big Lot's. I love it when I find cool things at Big Lot's! The envelopes in the crock are filled with some really nice beach scents.

"Life is a Beach" says so much!

"Loved you Once, Love you Still ... Always have and Always will"  is one of my favorites.

I'll be sharing this post with a few of the parties listed in my sidebar. I hope you'll visit my home page before you click through ... because you might find something you'll enjoy!

Corn Dogs at Home!


After spending 35 years working in the tourism industry, I can tell you that carnivals and outdoor events are no longer my favorite thing! However, I love the occasional taste of fair food ... 


So when I saw this machine that makes making corn dogs in the kitchen a breeze, I had to have one! No more frying.


I ordered mine from Amazon.com and the mix is sold right along with it, so order it, too! The instructions are very clear. I used Oscar Meyer bun length hot dogs and cut them in half so they fit perfectly in the machine. You mix the breading with a cup of water, pour a little in each slot, lay the dog in and pour a little more over the top. Snap it shut and let it bake. Notice that I used a mozzarella stick, too ... because one of us doesn't like corn dogs!


It is fun ... and makes perfect corn sticks, too.


I'll be sharing this post with some of the parties listed on my side bar, but stick around my home pages before you click through. You might find something else you like!

Homemade Pasta Sauce!


Miss Phoebe's herbs are growing so much, it is certainly time to start harvesting them. I can't think of anything better than using the first big batch to make homemade pasta sauce. I owned an Italian Steakhouse thirty years ago and I used to make gallons of sauce on a daily basis! I'd like to tell you I have a standard recipe written down, but I don't. It is all in the deep chambers of my brain!


Thirty years ago in the rural Midwest, we didn't grow fresh herbs like we do today. I, however, did my best to get fresh basil, oregano and thyme for my red sauce. I had a 'jobber' who brought it back to me from the huge fresh market in St. Louis. Now, I grow it and freeze it all summer long, so I have it to use in the winter. Fresh herbs go in almost everything I cook from vegetables ... to soups and stews ... to the coating on large pieces of meat.
For this batch of sauce, I used fresh Rosemary, oregano, thyme and lots of basil.  Roughly chopped, I had 2 cups of herbs. I browned a pound of ground beef, added a chopped sweet onion, a chopped rib of celery and a medium sized green bell pepper ... also roughly chopped. While the meat browned and the vegetables and herbs softened, I added a Tablespoon of beef flavoring, a teaspoon of garlic paste and a few grinds of black peppercorns. You can add salt, if you'd like. I don't because I add salt to my canned tomatoes and I always think that is enough.


After the meat browns, I add a 28-ounce can of tomato puree and a 15-ounce can of tomato sauce. I also add a pint of home canned tomatoes.

I stir all this together, bring it just to a boil and immediately turn it down to a low simmer. I place the lid on my big heavy pot and let it simmer for an hour.

By the time this simmers that long, your family ... and sometimes the neighbors ... will be starving for pasta!


This batch of sauce will easily coat 3 meals of pasta, so you'll want to freeze part of it. When you are ready to use it, thaw it overnight in the refrigerator and reheat it on a low temperature.

This is a perfect sauce to use in layering lasagna, to pour over meatball sandwiches, to use as pizza sauce and to use as a dip for warm garlic bread sticks. You won't have any trouble figuring out how to use it all up!


My family loves sauteed mushrooms over their red sauce. I use button mushrooms or baby portabellas and start them over low heat in melted butter. Just as they are about as soft as I like them (after about 4 minutes), I turn the heat on high and stir the mushrooms until the butter browns and the mushrooms caramelize.

That is what makes them really good!


Add a little parmesan cheese and warm gooey cheesy garlic bread ... after a little green salad ... and you have a fantastic meal. Enjoy!

I'll be sharing this post with a few of the parties listed in my sidebar, but before you move on ... check out my home page for more posts.  Happy sauce making!

Scallion Cream Sauce on Pork Chops


It was a rainy day and I needed a little comfort food! Boneless pork chops fit the bill, but how to fix them? I had a nice bunch of scallions in my CSA box this week, so I decided to make a cream sauce using some of them to create a mild onion flavor. I also had some pretty broccoli in my box, so I added it to the dish!

The first step in this easy recipe is to dredge the pork chops in a little flour seasoned with paprika, garlic powder, salt and pepper. Fry them on both sides in a couple Tablespoons of canola oil. Remove them from the skillet and add a couple chopped scallions to the oil. Cook the scallions until they begin to get soft.


Use 1 Tablespoon of the flour to make a roux in the remaining oil. If you don't have much oil, add a Tablespoon to the skillet. Sprinkle the flour right in over the onion bits. When the flour is bubbling, add 1 cup of milk to make a thick sauce.

Whisk in 4 ounces of cream cheese. Stir it gently so it blends in completely. Put the chops back into the skillet and cover with the sauce. Add the broccoli to the skillet, then cover it with foil and bake for 30
minutes at 350 degrees. The chops
will be tender and flavorful
and the broccoli will be perfect to
help soak up some of that yummy sauce. Serve this with noodles or rice.


This is a perfect meal for two people ... or one empty nester with left overs! I'll be sharing this post with a couple parties listed in my side bar, but make sure you check out my home page before you move on!


Phoebe's Chair Garden!


Phoebe has been helping a great deal with our little cottage rose bed this spring, so I let her take charge! She has chosen many of our hanging baskets and put them where she wanted them to go! I had my yard man cut my straggling roses back considerably in the winter, so we haven't had quite as good a showing, but they will burst with color again in late June and I'll photograph the whole garden then.

For now, here are a few pictures to show what we've done ... together ... Grandma following the eight year old!  I've had this old wooden chair for years and have used it in a variety of ways ... on the porch ... in the yard under shade trees ... always holding a pot of flowers of some kind. We decided to paint it this year and put it in the front rose bed. The pot holds oregano, dill and lemon sage. 

The wire rabbits have been painted a dozen different colors over the years! Right now they are red and need a new coat of some vibrant color!


Phoebe decided we should move our herb garden of pots from the back yard to the front, this year! Good call because the shade trees in the back have gotten so big and full that we get very little sunshine. We planted lots of basil, rosemary, thyme and chocolate mint for drinks! Don't you love the big leaves of sage in the top picture? I'm harvesting those and freezing them so I can use them under the skin of my Thanksgiving turkey. I love connecting all the herbs to special occasions for Phoebe. It helps her remember why they are important. We'll be making a pot of homemade spaghetti sauce this week when she is with me ... and we'll use all the Italian flavoring herbs that day. She'll love that experience! We'll put it in freezer containers and she'll take plenty of it home to share with her mom and dad!


Moss Roses were my husband's favorite flowers ... and we had a Labrador one time that liked to eat the red and pink ones ... Not the yellow or orange ones!
Joe's been gone four years, but I still plant his flowers each year and this year Phoebe placed them on a table with this cute little green bench and a rabbit! The heart in the following picture says "all my love - all my life" ... another tribute to Papa Joe.


This corner of the bed is important because Phoebe planted morning glory seeds in the big red pots ... and no, it isn't pumpkin time, but this pumpkin spends the whole year in our garden!

When the morning glories start growing and blooming, I'll photograph them again! They will spread all over the fence. I'm afraid she isn't being too patient waiting for them to start blooming.


You'll see more of Mr. Elephant later on a special July 4th tablescape, but right now he is gracing the coffee table on the front porch! We found him at our favorite little collectible shop! The cute cage stand came from the same shop several years ago. This year, Phoebe wanted to put flowers in it, too!


Hope you enjoyed a little tour of Phoebe's gardening ventures!  I'll be sharing with a few of the parties listed on my sidebar, but make sure you check out my home page before you move on. I've been posting lots of recipes lately!

February's Family Sunday Dinner

Christmas 2020

Mary Queen of Scots Dinner Menu Booklet

Grandma Debbie's Christmas 2018

Grandma's Blue & Green Pupkins!

Autumn at Grandma Debbie's