Pork Marsala


If you think Chicken Marsala is only a restaurant meal, think again!  It is so easy to make at home, once you try it, you’ll never hesitate to make it for a weeknight meal.  You could probably put it in the thirty-minute meal category if you do a little prep the night before!  What busy household wouldn’t love that?

I made this Marsala with pork and cut my medallions from a pork tenderloin.  Those usually come in a package of two, so I cook one and freeze one.  I’ll show how to use that second loin on another day!  Use a sharp knife to cut the medallions.  I cut them at ¾ an inch thick. 

Here are the ingredients you’ll need:


Pork medallions
about a half cup of chopped onion, red and green peppers
8 ounces of sliced mushrooms – you choose your favorite kind
Salt, pepper, Italian spices, flour for dredging the meat
Fresh thyme
3 Tablespoons of butter and an equal portion of olive oil
½ cup of Marsala wine
1 cup of chicken stock

This is easy to fix.  Slowly melt the butter and the olive oil in a big skillet.  Dredge the pork pieces in the flour mixed with salt, pepper and Italian spices.  Use a good Tablespoon of the spices.  Gently fry the meat in the butter/oil, turning the pieces after about 3 minutes.  When you turn the meat, add the onions, peppers and sliced mushrooms.  At this time, sprinkle fresh thyme leaves on the meat. As soon as the vegetables begin to get soft, add the wine and the chicken stock.  Let everything simmer for about 5 minutes.   It’s done!


You’ll notice that I have asparagus spears served alongside my meat.  I actually cooked those on the edge of the skillet, while everything else was simmering.  I served my Marsala with spinach/artichoke noodles.  So good.


Pretty Banana Brownies

If you are looking for a nice, sweet snack to take to the office or to a potluck, this is the quick recipe for you!  It is a 4 ingredient muffin, or brownie.  Call it what you like.  It fits both categories.  You start with an 18 ounce brownie mix.  Make sure you use a big mix … the kind that fills a 13 x 9 inch pan.  You are baking, however, in a cupcake tin. 


Ingredients:

1 18 ounce brownie mix
3 bananas
1/3 cup canola oil
3 eggs

Crush the bananas and mix the oil and eggs with them.  Gently fold in the brownie mix.  I like to add about a half cup of chunks of walnuts.

Fill muffin cups half to 2/3 full and bake at 350 degrees for 12 to 15 minutes.  Test them with a pick, but you want the center to be a little sticky.  Don’t overbake them and remember that the time required depends on how full the cups are.

Let the brownies cool.  You can leave the brownies in the paper cups and add the icing and chopped nuts to the top.  When I want to serve them in a prettier way, I remove them and place them upside down on a platter.  Then I drizzle the icing over them and sprinkle on chopped nuts.  The icing is simply powdered sugar, a dash of vanilla extract and a little milk or cream.  Thick is better!

There are lots of ways to make this recipe your own.  If you want the banana flavor to be prominent, add banana extract to  the icing.  Coffee extract changes it even more and you can top it with chocolate coated coffee bean.  Pecans instead of walnuts … are perfect.  Butter pecan flavoring in the icing tops that off.  The inclusion of bananas makes the brownies more moist than ever.

These are delicious and fit the bill for this time of year when we need great taste, a great look, but have just a little time.  Enjoy!


Fritters and Patties!


My daughter makes incredibly delicious pork fritters, the German way!  She pounds the pork tenderloin meat into a nearly plate sized piece of meat, double dredges it in four, egg and breadcrumbs …  and flavors it with her own blend of spices.  I don’t go to that much trouble, but what I have recently learned from her is that the meat is much more delicious if you spread it with prepared horseradish and grainy mustard before you dip it the first time.  For me, the first dip is in an egg wash.  Then I dredge it in seasoned breadcrumbs.  I season plain breadcrumbs with dried parsley flakes, garlic and onion powder, salt and pepper. I use thin slice pork tenderloin, often sold as boneless breakfast chops.  I pan fry my fritters in a little bit of canola oil.


On this day, it is what I did in the remaining oil that was more delicious than the pork fritters.  Earlier in the week, I had baked a couple medium sized sweet potatoes.  I had one for dinner and stuck the second one in the fridge.  I needed to use it.  I made sweet potato patties!  Or is it a sweet potato fritter?  The difference is simple.  Fritters are made with shredded raw potatoes.  Patties are made with cooked mashed potatoes.  In this case, a mashed sweet potato.

These are really too simple, but the must have ingredient is Pampered Chef’s three onion rub.  I use it as a seasoning blend on and in many things, but I don’t think this recipe would be the same without it.

Peel and mash a medium sized baked sweet potato.  Add one egg, a half teaspoon of salt and one Tablespoon of the three onion blend.  Mix it well.  Use a cookie scoop and drop balls of the mixture into the seasoned breadcrumbs.  (Important to note that these don’t have Italian seasoning in them.  Simple garlic, onion and parsley.)  Bread them all the way around and drop the balls into the pan for frying ... right in the oil left from frying the pork. Gently flatten the balls and turn them after a minute or two to brown the other side.  No additional seasoning is needed.

I served my pork fritters on buns with sweet mustard.  I added strips of a big white radish to my plate with the sweet potato patties.  This made a nice supper but would be equally delicious as breakfast or brunch with a poached egg!   Enjoy!


Mexican Meatball Soup


I’ve recently noticed several recipes online and on cooking shows for Mexican Meatballs. Years ago, I made them from a recipe in a New Mexico Cooperative Extension cook booklet that my brother gave me.  He raised his family in New Mexico. That recipe included raisins and said the meatballs were frequently served at wedding feasts. The recipes I was finding now did not include raisins, but the next time I make them, I’m adding them.  I think they give a deeper flavor.

My granddaughter loves chili, and she was staying with me the weekend before Halloween.  We always have a chili feast on Halloween, so knowing that … I needed to make us a soup that I was sure she would eat but was not too close to chili.  So, I reworked one of her favorites, chicken tortilla soup, and made it with beef stock and ground beef Mexican Meatballs.

This soup recipe is so simple and includes lots of canned ingredients.  It is quick to put together.  While it begins to simmer, you can make the meatballs and air fry them.  When they are done, just toss them into the simmering soup and in less than an hour, you have a delicious bowl of goodness.


Mexican Meatball Soup


1 cup of chopped onion, green and red peppers
1 quart of beef stock
2 15-ounce cans of mixed chili beans
1 15-ounce can fire roasted corn with peppers
½ cup uncooked rice
1 15-ounce can of red enchilada sauce
1 15- ounce can of fire roasted tomatoes
2 Tablespoons of tomato paste
1 can of tomatoes with chilis
1 small can of chili peppers
Season with a ½ teaspoon of  garlic paste, 1 teaspoon of chopped cilantro and ½ teaspoon of Mexican oregano.  Add salt and pepper to taste.

In a drizzle of olive oil, sauté the chopped onion and peppers until they are soft.  I keep a bag of frozen chopped onions and peppers and that makes this even easier to make.  Add everything else on the ingredient list.  Don’t drain the vegetables.  Stir it to combine, bring to a boil then turn down to a simmer.

While the soup simmers, make the Mexican Meatballs.  This, too, is a shortcut recipe.


Mexican Meatballs

1 pound ground beef
1 package of taco seasoning mix
1 can of green chilis
1 Tablespoon dried minced onion
1 egg and ½ cup of dried breadcrumbs
¼ cup of chopped fresh cilantro

Mix all the meatball ingredients together.  Use a small cookie scoop and portion out the meatballs.  With wet hands, roll the meatballs until they are firm.  Cook the meatballs in your air fryer.  I cooked them at 370 degrees for about 8 minutes.  Watch them because every air fryer seems to be different, and you don’t want to burn them.

When they are done, gently drop them into the soup pot and let it simmer for another 30 minutes.  You are done!  Delicious soup that is great topped with shredded cheese, corn chips or salt crackers.  It is a wonderful meal served with warm cornbread.

Potato & Crab Chowder


I’m doing a good job making my little batches of soup. I’m learning that when you cut recipes down, you don’t have to use absolutely all the original ingredients.  This recipe is an amended version of Potato Seafood Chowder.  “Seafood” became just crabmeat. The original version had shrimp, oysters, crabmeat and scallops in it.  The original version also calls for seafood stock or a bottle of clam juice.  I substituted those flavors by adding a teaspoon of Ranch Dressing mix.  Different flavors, but I didn’t miss the seafood stock.  There are so many spice blends available now.  When I started cooking 45 years ago, we had to stock all kinds of dry herbs to make our own blends.  Cooking from scratch has become much easier and that’s a good thing.  Young families don’t have time to cook like at home moms of the 1960s did.  Use whatever makes your job easier.

I’ve been thinking a lot about a fall vacation my husband and I took years ago.  We had scheduled an October vacation to Myrtle Beach, SC months in advance.  Then Hurricane Ophelia started her way up the east coast.  We hesitated.  We cancelled.  We changed our minds when the hurricane just swirled off the cost, and we rescheduled.  Off we went and as soon as we reached Myrtle Beach we loaded up on fresh seafood and groceries.  We figured we would be ‘stranded’ in our corner suite for a few days.  That is exactly what happened.  We cooked, ate, and enjoyed watching the storm from our 6th floor ... floor to ceiling windows.

This chowder is a simple reminder of that exciting vacation.  I enjoyed my chowder with a couple slices of orange infused beer bread.  I love the Pampered Chef beer bread mix.  I made it using orange LaCroix,  and a Tablespoon of orange infused olive oil.  I added 1/3 cup of Feta cheese chunks. I baked in three small bread pans so I could easily store portions. The truth is, I love it too much so I have to hide a portion for later.   So delicious and so easy.


Potato Crab Chowder

1 big Idaho potato, peeled and chopped
1 stalk of celery, chopped
1 ½ cups water
a sprinkle of onion powder
1 teaspoon Ranch Dressing Mix
½ teaspoon celery flakes
½ teaspoon parsley flakes
1 cup of frozen corn kernels
1 small can of crabmeat
1 ½ cups Half and Half
Thicken with instant mashed potato flakes

Combine the first 6 ingredients in a crock pot and cook on high until the potatoes are done.  Add the corn and 30 minutes later add the crabmeat and Half and Half.  Stir in instant mashed potatoes a Tablespoon at a time until the chowder reaches the desired thickness.  Add a generous sprinkle of black pepper and a little salt before serving.


Gnocchi Soup


I’ve decided to try some new soup recipes as I teach myself to convert recipes to small batches.  As I’ve written before, I love soup … once.  I don’t want leftovers and I don’t want to fill the freezer with little containers that never get used!  I’m looking for a nice Saturday supper and a weekday lunch that I can take to my office and heat in the microwave. Nothing more.

I’m happy to use my 1.5 quart crockpot to make Saturday soups.  It is the perfect size and forces me to make a little batch.  I almost always have small portions of cooked chicken in my freezer.  Those are little packages that I tolerate! 


Gnocchi Soup

To make this soup, add the following ingredients together in the crock pot and cook on high for 2 hours:


4 cups of chicken broth
1 cup of these vegetables all combined – chopped onion, celery, red pepper, broccoli and carrot
½ cup chopped cooked chicken
¼ teaspoon of dried thyme
A dash of dry mustard, a dash of pepper and a dash of salt

After this has cooked for 2 hours, add about 4 ounces of miniature potato gnocchi and cook on low for another 30 minutes.  The gnocchi is precooked, so you are really just heating it through. It will thicken the soup a little.

Stir in a Tablespoon of butter and serve.


Soup has always been a part of fall and winter weekend life for me.  My mother always had a pot of vegetable soup and sometimes a second pot of chili ready for lunch on Saturdays.  This was after the family had a big early breakfast and left the house for any of a variety of projects.  My brothers and my dad knew that a big warm bowl was waiting for them at lunchtime.  Dinner, or supper as we called it, was usually on the lighter side, but always included a delicious piece of pie or cake.  Mother baked on Saturdays for her big Sunday dinner.  We always had something to sample on Saturday evening.

I carried on this tradition when I was making my own household.  Soups or chili seemed to be the foundation for college football weekends, local festival parades and antique shopping jaunts.  We always returned home to that warm bowl!

Today, one of my brothers can duplicate our mother’s vegetable soup.  He cans his own tomatoes and for years has raised a nice vegetable garden.  My chili is as good as Mama’s, but it is really made from my husband’s recipe! What remains the same is that whenever we make either, they warm our souls as we sit together around the table.


German Creamy Brussels Sprout Soup

I enjoy a bowl of soup on a cool weekend, but it has taken me ten years to get to the point of making small batches for my empty nest.  I’ve converted this recipe over the years and have simplified it so it is easily cooked and easily cut in half, so I don’t have leftovers for a week.  Speaking of leftovers, though, you can make this soup using leftover vegetables prepared for another meal.  Just reduce the cooking time by an hour.  You can also use chicken or vegetable broth instead of beef broth.


I first had this soup in a German restaurant in Chicago.  I studied the ingredients and came home and made it.  I don’t know how “German” it really is, but I enjoy calling it that.  It is delicious served with warm rye bread, but this time I just made a box of cheddar biscuits to have with it.


Creamy German Brussels Sprout Soup

2 cups brussels sprouts halved
2 cups cubed potatoes
2 cups carrots, sliced or cubed
1 tsp onion powder
1 tsp marjoram
4 cups beef stock
2 cups half and half
Salt and pepper and a pinch of nutmeg
½ cup chopped fresh parsley

This crock pot soup is so easy.  Add the vegetables, beef stock, onion power and marjoram to the crock pot.  Cover and cook on high for 2 hours.  Add the half and half and cook another hour.  Add the salt and pepper to taste, and finish with a pinch of ground nutmeg.  Stir in the fresh parsley.

If the soup isn’t thick enough, add mashed potato flakes  by the spoonful until it reaches the thickness you desire.


Phoebe's Tres Leches Cake


When my granddaughter says she wants to bake or cook something, I’m always in!  Her latest interest was in baking a Tres Leches Cake.  Did you know there is a Tres Leches Cake mix?  We didn’t use it.  I wanted her to learn how to make if from scratch.

There are zillions of recipes for this cake online.  I chose to use Pioneer Woman’s recipe, changing the flavoring extract from vanilla to almond.  The cake is essentially a sponge cake, and I’ve been baking those for forty years.  A sponge cake is my go-to when I want a dynamite flavor in the cake mix.  A sponge cake is also better the second day than the day it is baked.  Sponge cake is the foundation for peanut rolls, which are a favorite fundraiser in my neck of the woods.  You can’t go wrong with a sponge cake.

We started our cake adventure on a Sunday at noon.  We baked the cake, poured the three milk combination over it and refrigerated it until dinner time.  Just before serving it at dinner, we whipped the frosting.

Here are the ingredients you’ll need:

1 cup of all-purpose flour
1 ½ teaspoons of baking powder
¼ teaspoon salt
5 whole eggs, separated
1 cup of sugar
1 teaspoon almond extract
1/3 cup whole milk

For the three-milk combination that your pour over the cake:
1 can evaporated milk
1 can of sweetened condensed milk
¼ cup of whipping cream

For the icing:
At least a pint of whipping cream. I used 3 cups.
3 Tablespoons sugar


Here is how we made it!


We used a stand mixer, but a hand mixer will work fine. Unlike the recipes tell us, I begin by separating my eggs and whipping the whites until stiff, but soft.  I pour the egg whites into a smaller container, so I only have to use one bowl for the stand mixer.  The whites will stay perfect until you are ready to fold them into the batter.


Then we creamed the egg yellows with the sugar and the almond
extract.  When the eggs are light yellow and creamy, whip in the 1/3 cup of milk.

Now it is time to blend in the flour.  Mix the baking powder and the salt with the flour so it is well distributed, then blend in the flour.  When this is well mixed, it is time to fold in the egg whites.  We used a spatula to do this.  We removed the bowl from the mixer, poured the egg whites in and gently lived the batter from the bottom, folding in the egg whites.  It is important to do this gently, so the batter is light and fluffy.

Pour the batter into a 13 x 9 inch pan which has been prepared with baking spray.  Bake for 35 minutes at 350 degrees.  Remove the cake and let it cool.  We left our cake in the pan,  but you can turn it out onto a serving piece if you’d like. 

While the cake is baking, mix together the 1 can evaporated milk, 1 can of sweetened condensed milk and ¼ cup of whipping cream. You can do this with a whisk or a fork in a measuring cup with a spout.


After the cake cools for about 30 minutes, use a fork and pierce holes all over it.  Don’t think of this as a “poke cake” and use the handle of a wooden spoon.  You need to use the fine tines of a dinner fork.  Pour the three milk mixture over the cake and along the edges, so the mixture soaks in the cake.

Cover the cake and refrigerate it for at least three hours.

When you are ready to frost  the cake, whip the whipping cream with 3 Tablespoons of sugar until stiff peaks form.  Use the whipped cream as frosting.  Place a maraschino cherry on what will be each piece of cake.  We guessed we’d cut 12 pieces of cake.  In reality, 16 or 18 pieces would have been plenty big enough.


Tip about maraschino cherries – If you just lift the cherry out of the jar and put it on any cake frosting the juices in the cherry will run all over the frosting.
  You can prevent this by counting out the cherries you need and placing them on a couple layers of paper towels.  The juices will run out and the cherries will essentially be dry when you use them.

You can tell my looking at this picture, that this cake was scrumptious.  It was shared with friends, but it still took us about three days to finish it off!


If this looks like an unhappy baker, she's not.  She never wants to have her picture taken, although her career goal is to be a photographer!  She just likes the other side of the camera.

Make this cake.  It is delicious.


CHICKEN & ARTICHOKE LASAGNA


This is certainly not traditional Italian Lasagna, but here's a little story! Growing up in a German - Scottish family in a very small Southern Illinois town, it is probably no surprise that when I was first married, I had never tasted lasagna. Neither had my husband, but he knew what it was and suggested I add it to my list of new recipes!  He loved to eat, and he loved to watch me learning to cook for him!

I shopped at a small neighborhood grocery store that I had grown up shopping at with my mother.  Joe loved their fresh meat counter, their hand mixed pork sausage and the fact that we could have steaks and roasts cut exactly like we wanted them.  It was at Buck's Grocery Store that I found a package of square German-style noodles ... that had a recipe for lasagna on the back!  This lasagna recipe had a homemade meat sauce recipe included and it called for cottage cheese.

I should note that my German Grandmother made a noodle dish that included cottage cheese, so this was nothing unusual for me. Back then, in my little town, you couldn't find a pint of ricotta cheese (even though Grandma made something similar).  Click right here if you want to see my post for Grandma's Cottage Noodles.

Ok ... back to today's recipe.  It is made with left-overs!  I had 2 little chicken tenders left from another dish. I almost always have a bag of fresh spinach getting old in the fridge! I had artichoke hearts left from making Phoebe's favorite dip! Cottage cheese is a staple at my house and I always have a container of nice, thick German-style noodles.  I use them for lots of things!

Chicken & Artichoke Lasagna

Mix together:
1 cup of chopped cooked chicken
2 cups of fresh baby spinach leaves
1 cup of cottage cheese
1/2 cup parmesan cheese
1/2 cup chopped artichoke hearts in oil
1 egg, whisked

Begin layering using 2 cups of cooked noodles ... adding the chicken mixture, a layer of mozzarella cheese, more noodles, more chicken mixture. Top with a little more parmesan and a few pieces of mozzarella cheese.

Pour 1 cup of half and half over the top of these layers.

Cover with foil

Bake at 350 degrees for 45 minutes.  I used my NuWave, so 30 minutes finished mine!


END OF STORY:  Later in our marriage, Joe and I bought an Italian Steakhouse!  I made my lasagna by the "tons" ... sure seemed like that much, anyway!

What to Serve on July 4th?

Are you planning your July 4th menu and just don't know what to fix?  A few years ago, my husband and I took a week off around the 4th and I kept track of all the food I prepared during that week.  I know you'll find something in this post that looks good!


Grilled Beef Fillet and Shrimp

This couldn't be easier to prepare.  Sometimes you can even buy the shrimp already skewered from your seafood counter at the grocery.  Depending upon the size of your fillet, it will take about 10 minutes on a hot grill, turned once.  For medium rare, the internal temperature should be about 135 degrees.  You can use a spice combination on your steak.  We prefer a little salt and pepper only.

The shrimp are quick.  I like to drizzle mine in orange infused olive oil.  No spices beyond that flavor.  Again, you can spice yours with any combination you like.  Lemon pepper is great.  Turn them once and as soon as they are pink, they are done.  Just a few minutes.

I added roasted potatoes with sour cream and dill ... and a savory roll.  Delicious meal.


Blackened Red Fish and Shrimp

This meal was totally prepared in a big cast iron skillet over a wood fire ... outside.  You can do it easily in your kitchen, but the skillet needs to be hot for the blackening spices to stick.

Let's talk about the sides, first.  These are fingerling potatoes which I boiled first so they would quickly 'scar' on the hot surface of the skillet.  The brussels sprouts were steamed and barely seasoned with salt.  We love the earthy flavor, so I don't season them much.  After you blacken your fish, let the skillet cool down considerably and throw the potatoes ... cut side down ... on the surface.  They will absorb the flavors from the fish and crispen up.  Use a metal spatula to lift them off the skillet, so the crusty stuff stays intact.

I confess.  I use Paul Prudhome's blackening spices.  All you have to do is dry your fish and shrimp.  Sprinkle generously with the spice and carefully lay them on the hot skillet.  They will pop and sizzle and cook quickly.  Turn them with a metal spatula so you are lifting up the 'blackened' bits.  A fish fillet (and you can use any kind of fish) will take about 3 minutes per side.  The shrmp, depending upon the size, will take anything from a minute per side to 3 minutes per side.  You'll know when both are done.  They'll be firm and will have lost their gloss.  

In this picture you can see a little bit of sweet and sour corn relish on the fish.  It is a wonderful addition to the flavors and cools down the heat from the blackening spices.  Remember, you can control the heat of your blackening spices.  If you like 'hot', use plenty.  If you don't, use less.   Lots of iced tea or a cold beer makes this meal better.


Stuffed Pork Tenderloin off the Grill

This tenderloin was stuffed with sweet red bell pepper slices and scallions.  I grilled the onions and peppers first to soften them.  Let them cool down before stuffing the pork.

Prepare the pork by butterflying it.  Use a sharp knife to begin cutting the length of the tenderloin to open it up.  If you are unsure about this process, Google and find visual instructions.  It is simple.  I seasoned this tenderloin inside and out with a sprinkle of taco mix ... right out of the little packet.  Place the onions and peppers lengthwise on the pork and roll it back up.  Tie it closed at a few locations.

Grill the tenderloin over high heat.  Place it over the heat for about 5 minutes.   I love the word 'scar'.  It will scar, then you should turn it and leave it about 3 minutes on the other side ... or sides.

Place the tenderloin off the high heat and let it continue to cook until the internal temperature reaches 140 degrees.  I brush mine a few times with tomato juice. Remove from the grill and let the meat stand for ten minutes before serving.

Pork tenderloin cuts usually come 2 in a package, so plan to prepare them both.  This recipe is pretty easy ... just a little time consuming.  When you butterfly the meat, you can take another step and pound it out to make it thinner.  I don't usually do that, but it makes a neat presentation.

I usually prepare additional grilled vegetables to serve alongside the meat.  Rice or a potato ... or even pasta tossed with oil and herbs ... would make nice sides.


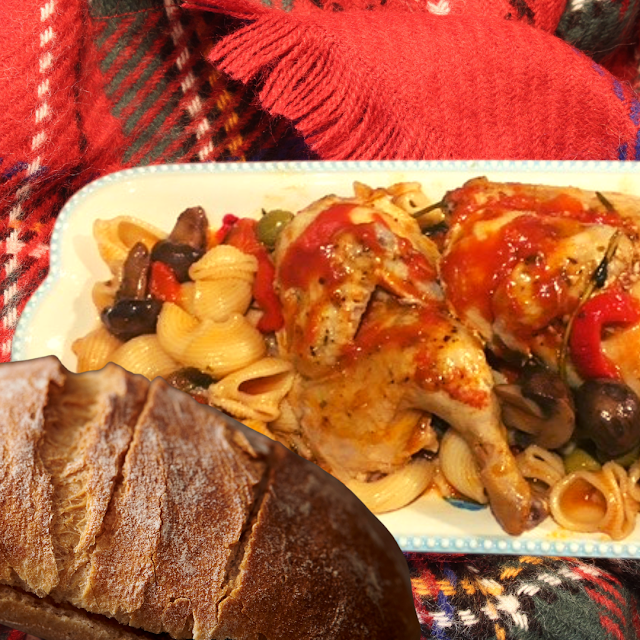
Slow Grilled BBQ Chicken

The best BBQ Chicken is cooked over low heat on the grill.  It usually takes at least an hour.  Sometimes a little longer. Breasts take longer than other pieces of chicken, so I usually cut a breast into 4 pieces ... spliting each half again.

Bring the temperature of your grill to about 375 degrees.  Place the chicken pieces over the direct heat and watch the pieces so they don't cause a flair up.  Turn them after a couple minutes so both sides are braized.   Then ... move the chicken to a cooler part of the grill or redduce the heat (on a gas or electric grill) to about 300 degrees. Turn them about every 15 minutes.  In what will be about the last 20 minutes of cooking, brush your favorite bbq sauce on.  In 10 minutes, turn the chicken and brush the other side.

Internal temperature  for chicken should reach 165 degrees.  Juices will be clear and the meat will be very tender.

We love corn on the cob and sliced tomatoes with this meal.  I usually cook the corn on the grill while the meat is cooking.  Just leave the shucks on the corn and move it around on the grill so all sides sit on the heat.  It will be juicy and delicious.  There are many ways to cook corn on the cob ... other than boiling a giant pot of water.   Look on line for microwave methods.  Make the process as easy as possible.
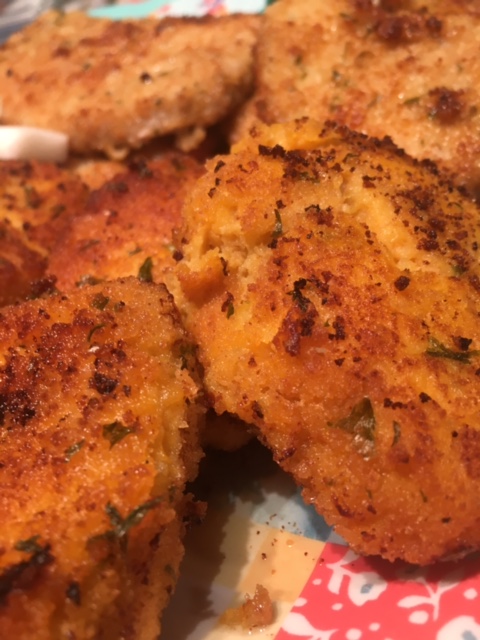


Ground Pork Sliders

We love pork burgers and these small versions were delicious.  One is topped with sliced Swiss cheese and the other with Cheddar.  Everything we love to dress them with is shown in this picture.  Onion and tomato are my favorites, but pickles are good.  Sweet red pepper relish is a tasty addition.

It is important to remember that slider burgers are small and it is easy to overcook them.  Don't.  When you place them on a 350 degree grill, stand right with them and turn them after a couple minutes.  Watch them carefully so they don't scorch.  It won't take a slider more than about 6 minutes.  Remove them from the heat and serve them immediately. 

Potato salad, macaroni salad, pasta salad ... or just chips ... are perfect on the side.


The Table is Set!

I am reposting this from a few years ago.


The Table is Set!


It has quit raining and the sun is shining ... just in time to set the table on the back deck for an evening meal!  The meal celebrates American Independence! 

I love the old movies that run on the 4th of July ... like Drums along the Mohawk with Claudette Colbert and Henry Fonda who portray newlyweds at the time of the Revolutionary War.  I decided to set a table following that theme, in part!


This gray/blue and white china is American made Royal and the pattern is "Pilgrim".  The scenes of colonial farming look so similar to some of the scenes in the movie!   I decided to use my new 'rag rug' place mats from Pier 1, because that weaving style replicates what might have been used in Colonial America.   The patriotic napkins came in a pack of 6 from Kohl's ... and each napkin was a different print!   Did I need new things for a July 4th table?  No.


Here are some other elements of the place setting.   The red, white and blue stemware are all different patterns from my vast collection of glassware.  The Cambridge flatware is something I use over and over.   Notice my patriotic pig.  Pigs are usually incorporated into my tablescapes, because my brother has called me 'Little Oink' or 'Oinker' my whole life!


The elements of the composed centerpiece are old and new.  The little wooden boxes came from Big Lots, which is one of my favorite places to buy very inexpensive decorator items.  The Hall pottery pitchers were new when I was a youngster.  That makes them antique, now!  I've used them hundreds of times for everything from flowers to fresh cream on the coffee bar.  The little red wicker chairs are used for whimsy.  We are flag people, so finding a bundle hidden away is never very difficult.


I hope you all have a wonderful 4th of July and that you remember those Colonials who fought so hard to give generations to come a free and prosperous home.

Thanks for stopping by.  I hope you'll linger ... go to my home page ... and check out other posts.


Pot Roast - Comfort Food for the Family


When we talk about comfort food in my family, pot roast is always at the top of the list.  We talk about the way my mother made it, but we talk about the way we’ve made it for decades.

If my mother were living, she would be 99 years old.  Her pot roast was unmatched during my childhood.  Long before the days of crockpots, Mother slow cooked her beef chuck roast for a long time and ended with the most tender and flavorful meal.  Chuck roast was the key and probably the cut of roast that we could best afford,  We did raise a cow one time and put beef in the freezer, but that was not common.  The corner grocery store was where our meat came from.

In a big cast iron deep skillet with a good lid, Mother would brown her roast on all sides.  Salt, pepper, chopped onion and a couple cups of water is all she added to begin the very slow simmer.  The heavy lid was a must.   Potatoes and carrots were added later and by suppertime (dinner) or Sunday dinnertime (lunch) we had the wonderful meal.

My husband’s favorite pot roast recipe couldn’t have been easier.  The meat was browned then placed in a heavy casserole with a lid. We covered the roast with onion soup mix, added a couple cups of water and let it bake at 325 degrees for 3 or 4 hours.   Perfect at the end.

Joe and I made pot roast using the onion soup mix for decades.  I’m tired of that flavor and because I end up with too much meat left over and converted to other meals, I’m really tired of that flavor.  I’m also tired of having too much pot roast left over, so I had the butcher cut a nice 4 pound roast into 3 pieces for me.  I’ll cook one at a time.


I love leeks and found some really pretty ones at the fresh foods market.  I’m also loving two seasoning rubs from Pampered Chef … Dijon Mustard and Three Onion.  My choice for bouillon these days is “Better than Bouillon” and the sauteed onion flavor is so good.

Add mashed potatoes and mixed vegetables to this meal and you have something that takes you back to your childhood … or something that creates new memories for grandchildren.

The recipe is simple.  Let me say first, If you are cooking  a 1 – 2 pound roast, high in the crockpot for 2 -3 hours does the trick.  You can cook it on low for double the time and if the roast is closer to 4 pounds, you’ll need to cook it on low for 8 hours.   Perfect to set it up before you leave for work.


I placed half a leek, green and white parts, in the crock pot and poured 2 cups of water over it.  I smeared the top side of the meat with a Tablespoon of the Better than Bouillon.  I sprinkled a heaping teaspoon of each of the Pampered Chef seasonings over the meat.   After the meat was done and fork tender, I turned the piece of meat upside down and pushed it around in the liquid.  That way, some of the flavoring that had caramelized on top of the meat was blended into the water for flavor.  I made a slurry of 1 Tablespoon of corn starch with 1 cup of cold water and poured it into the crock pot … made sure it was set on high … whisked the gravy/liquid around … put the lid back on and in 30 minutes I had a nice gravy.


Hunter's Chicken


During the time that we owned an Italian Restaurant, I made lots of Chicken Cacciatore. My husband liked to call it Hunter’s Chicken to give it a more ‘rural comfort food’ appeal. The menu said one thing, but Joe called it something else! 

Food historians believe that this dish originated in about 1500 in Italy. The lore suggests that hunters returned from the woods with their fowl and along the way, they gathered wild mushrooms and herbs to flavor the pot. 

Long after our restaurant days, I continued to make Hunter’s Chicken for our family and friends. I still love to tell the story of Joe’s interpretation. 

We can attribute this deliciousness to Italy, but truth be told, several cultures have similar dishes. In France it is called Chicken Chasseur, chasseur meaning hunter. In Spain there is another version of the crispy browned chicken smothered in a reduced sauce. 

I’m sharing my version of preparation, but I encourage you to google recipes until you find one that appeals to you. Don’t go buy special ingredients. Use what you have and don’t hesitate to make substitutions. If you don’t have black olives, use green! You don’t have to use chicken. This time, I used a little game hen, because I was cooking for one! If you don’t have olive oil, use canola oil. Make this recipe your own. That is what comfort food is all about. 


Hunter’s Chicken for Joe 

Primary ingredients: 

1 game hen 
Roasted red peppers from a jar, in oil 
Olive oil – garlic infused 
Green olives 
A handful of fresh Mushrooms
Onions 
1 cup of chopped tomatoes 
1 8-ounce can of tomato sauce 
Italian herbs and spices 
Pasta 

 This is prepared in one pot. Split the game hen. Season with a little salt and pepper and dried Italian herbs. Brown the meat on both sides in a 2 Tablespoons of garlic-infused olive oil. After the skin is browned, remove the meat from the pot and add 1/2 cup of coarsely chopped onion. When the onion starts to soften, add the mushrooms and return the hen to the pot. At this point, add fresh herbs (parsley, basil, rosemary), 1/2 cup of green olives, several slices of roasted red pepper with a little oil from the jar and the tomatoes and tomato sauce. Make sure you have enough liquid in the pot to allow the little hen to simmer. Add a cup of hot water if you need it. 

In the last 10 minutes of cooking, you can add a cup of uncooked pasta. You can also skip cooking the pasta with the other ingredients and serve Hunter’s Chicken over rice, fried potatoes or cooked pasta. Make sure you have crusty bread hot from the oven. You won’t want to let even of drop of the broth go to waste!


February's Family Sunday Dinner

Christmas 2020

Mary Queen of Scots Dinner Menu Booklet

Grandma Debbie's Christmas 2018

Grandma's Blue & Green Pupkins!

Autumn at Grandma Debbie's