How Old Is Your Quiche?

Sometimes when I research recipes, I decide that all foods lead to Germany! Seriously! When we think of quiche, we first think of Quiche Lorraine … France. Lorraine is a region in the eastern portion of France that formerly bordered Belgium, Luxembourg and Germany. Lorraine is famous for a variety of foods including quiche, but the word itself probably comes from the German word ‘kuchen’. A kuchen is a cake with a custard-like filling.

Without detailing European history of wars and of countries taking over other countries, it is important to note that what we know today as Alsace-Lorraine (ceded to Germany by France after the 1871 Franco-German War) is probably as much German as it is French … and the foods are certainly reflective of that. Much of the area is rural, so it is natural to find wholesome, simple recipes. As fancy as some think it is, quiche is actually one of those simple country foods.

Food historians believe that Quiche Lorraine first came about in the 1500s. While there are several ancient notations for similar items, prominent writings date to the 16th Century. The primary ingredients of the recipe include cream and eggs in a fluffy pastry. Bacon was added after Lorraine became known for smoking meats and making sausages. In 1586, the Duke of Lorraine, Charles III was such a fan of Quiche that management at his favorite hotel worried about the losses they were taking on the Duke’s indulgence! By the early 1700s, the royals in the region were still eating quiche, but by this time, cheese had been added. We can assume that the creamy Swiss and Gruyere were favored because they melted easily. At this time, the recipe for Quiche Lorraine included bacon, cream, eggs, onion cheese and harkening back to Germany, nutmeg!

In the United States, quiche first appeared in the 1931 version of Irma Rombauer’s Joy of Cooking. Rombauer had a German ancestry and her first self-published cookbook was filled with recipes she knew from her family history. A recipe for tartlets appeared in a 1941 cookbook and in 1951, a new version of a full-sized recipe was in Rombauer’s newest edition of Joy of Cooking.

First Lady Jacqueline Kennedy should be credited for making Quiche Lorraine a popular ‘fancy’ food for Americans. It was a staple on White House luncheon menus and her favorite recipe was included in the cookbook authored by the White House chef during the Kennedy administration. By the 1970s, culinary writers were describing the wide variety of quiche found in restaurants across America. In the early 1980s, I prepared two varieties of quiche every day in our restaurant and we served slices with soup, salad or fresh fruit. While I made special varieties, I also made a ‘garden mix’ variety using vegetables left from the previous day! Every chef did that if they were smart!

Quiche was not a popular at home meal item during my favorite vintage period … the 1950s and 60s. It did, however, gain popularity during the early days of my home cooking! It is still popular at my house and my granddaughter even loves it! I’m going to share two specific recipes today, but I also want you to have the standard portions of ingredients. A 9-inch quiche requires a pie crust, 4 eggs and 1 ½ cups of cream. Half and Half works and sometimes I use canned evaporated milk with whole milk. I add ¼ teaspoon of nutmeg and 1 cup of shredded cheese. The vegetable combination is up to you! This size quiche needs between 1 and 1 ½ cups of meat and vegetables. Bake at 350 degrees for 45 minutes.


Bisquick was introduced in 1931 and was first promoted for making biscuits. In 1970, the Bisquick Impossible Pie was introduced and became very popular. The first Impossible Pie was for a custard pie. Then came an Impossible Coconut Pie … then hundreds of combinations followed including quiche.


The Basic Bisquick Quiche Recipe 

2 cups milk, half and half or evaporated milk 
1 cup Bisquick or any other baking mix 
4 eggs 
dash of salt and pepper 
1/4 teaspoon nutmeg

Whisk all the above ingredients until smooth. 

Add any kind of shredded cheese you like, but make sure you add at least a cup. 

Add about 2 cups of other cooked ingredients and bake at 350 degrees for 45 to 55 minutes. 


For this quiche, I fried a half pound of breakfast sausage with 1/4 cup chopped onion and 1/4 cup chopped sweet green pepper. I let this cool, then added it to the milk/egg ingredients. When I poured the mixture in my greased baking dish, I dotted the top with some of my small tomatoes and asparagus. Tomatoes and asparagus did not need to be pre-cooked. I used a combination of cheddar and jack cheese.


Asparagus & Bacon Individual Quiche 

1 ready-made pie crust 
4 eggs 
1 ½ cups Half and Half 
4 strips of bacon 
1 cup chopped asparagus 
1 ½ cups shredded Swiss cheese 
¼ teaspoon nutmeg 
¼ teaspoon pepper 

Chop the bacon and fry it along with the asparagus pieces. Cut the pie crust sheet into 4 rounds to fit individual pie dishes and press it into the pie dishes. When the bacon/asparagus is done, remove it from the skillet and drain it. Divide it between the pies. Divide the cheese between the pies. Whisk together the eggs, Half and Half, nutmeg and pepper. Pour equal portions in each pie shell. Bake at 350 degrees for 35 minutes.


Quiche is certainly historic! This post is part of my Vintage Vegetables special project. If you’d like to see similar recipes, click the menu tab. I’ll also be sharing this with a couple blog parties, so click through those listed on my sidebar. Enjoy!

Freshen Up Your Chop Suey!


The history of Chop Suey is sketchy!  Most food historians believe it was first created in the United States, but other information suggests that may not be true. 

E. N. Anderson is a retired professor of anthropology from the University of California at Riverside.  He has written quite a bit about the origins of Chinese food and he traces Chop Suey to something called ‘ tsap seui’ which means ‘miscellaneous leftovers’! The dish was common in Toisan, a county in the Guangdong province of China.  I am in no way a student of Chinese-American history, but I find it interesting that Toisan is the origin of most of the original Chinese immigrants to the U.S.  

Another account that links Chop Suey directly to China comes from Li Shu-fan, a prominent Hong Kong surgeon and political notable.  Li reports that he knew of ‘tsap seui’ having been popular during the 1890s in Toisan.  It was made from chicken gizzards and livers, pig’s tripe, bean sprouts, water chestnuts and vegetables.


There are two popular stories about the American origins of Chop Suey.  I think both are credible!  When a Chinese diplomat, Li Hongzhang, visited the United States in 1896, he brought three chefs with him, but he still visited a New York Chinese restaurant where the chef created the new dish using scraps and leftovers.  Is this story believable?  Yes, but some think that a Chinese American restaurant owner just took advantage of Li’s presence and made up the story to promote Chop Suey!  Smart!

The dish might have been ‘invented’ 30 years earlier in San Francisco. Drunken gold rush miners converged on a Chinese restaurant after hours, demanding a meal. The cook didn’t have any fresh food, but he threw leftovers in a wok and served the miners. They loved it and continued to visit the restaurant. Did Chop Suey originate for a bunch of drunks?

Wong Chin Foo was the first Chinese immigrant to become a naturalized U.S. citizen. He was a prominent author and wrote an article for the Brooklyn Eagle newspaper in 1884. He describes Chop Suey as the ‘national dish of China’.

Liang Qichao was a Chinese intellectual and progressive reformist. After spending time in Canada and the United states in 1903, he wrote about a food item called Chop Suey which was served in Chinese restaurants but was not eaten by Chinese people because of the really awful cooking technique! 


The earliest written account of Chop Suey, however, dates to 1590. Journey to the West is a classic novel in China and the character tells a vicious lion monster that he has brought a pot for cooking ‘za sui’ and will savor the lion’s liver!

All this information just to introduce a popular food from my favorite vintage period … Chop Suey … right from a 1950s La Choy can! The 1920s Chop Suey craze in the United States prompted the creation of the La Choy company. Its founding is an interesting story, but a topic for a different post! Check it out right here!

It was the convenience of the canned products like bean sprouts, water chestnuts or all the Chop Suey vegetables together … that made the dish so popular with mid-century home cooks.  It was popular for 20 years, but eventually lost its place to freshly prepared Chinese dishes.  Early TV chefs started teaching us how to prepare things like Sweet and Sour Chicken and Peking Duck!  We discovered woks and realized that stir-fried vegetables were healthy for us, so the trend died out.  


In my household, though, Chop Suey with some of those La Choy canned ingredients is still popular!  I make certain to add lots of fresh vegetables and barely cook them!  We like the crisp bite along with the ‘canned’ bite!  I keep the sauce light and go easy on the addition of salt because those canned vegetables contain plenty!  Work to freshen up your ingredients!


Big Daddy’s Favorite Shrimp Chop Suey

Prepare the sauce ingredients and have it ready to add to the stir fry.  Combine the following:

2 Tablespoons corn starch
2 Tablespoons soy sauce
1 Tablespoon Oyster Sauce
Dash of rice wine vinegar
Salt and pepper to taste
1 cup of fish stock, clam juice or chicken bouillon

Stir fry the following ingredients:

2 carrots, sliced thin
8 ounces of snap peas – fresh
2 ribs of celery, chopped
1 red bell pepper, chopped
8 ounces of sliced mushrooms

When the vegetables are crisp tender, add 12 - 16 ounces of peeled and deveined shrimp.  As the shrimp begin to turn pink (will take less than 5 minutes) add 4 sliced green onions and the following canned items:

1 can bean sprouts - drained
1 can tiny ears of corn - drained
1 can bamboo shoots - drained
1 can water chestnuts - drained

Stir everything together until it heats through and add the sauce ingredients.  Cook another few minutes until the sauce thickens.  Serve with white rice or fried rice … or over noodles.   While I would never add chicken livers or gizzards to this recipe … it would be great to add bits of chicken, pork or beef to the stir fry … or substitute the shrimp with those meats!  What we do enjoy adding to our Chop Suey are crunchy Chow Mein noodles! ... also La Choy!


There is almost no way to make a little bit of Chop Suey, so plan on leftovers!   This batch easily makes 8 servings! 

This post is part of my 2020 Vintage Vegetables project.  I’ll also add it to a couple blog parties, so make sure you check the list in my sidebar!   Enjoy.

Oak Leaf Kale


Did you know that kale and quinoa were introduced to the United States at the same time?  Yep!  That is the case, and they didn’t arrive in the 1990s when we know their popularity exploded … but a hundred years before.  David Fairchild was a USDA botanist and world traveler.  He explored the world and brought 200,000 new fruits and vegetables to the United States.

Fairchild’s job was to travel around the world and find these crops, research them and make certain it was safe to bring them to the U.S.   His interest in botany came naturally.  He was born in Michigan and his father was the first president of the Michigan State University.  Later the family moved to Kansas, where his father was President of Kansas State University.  Both universities had strong agricultural programs and Fairchild had first-hand knowledge of the lackluster foods of America at that time.  The Smithsonian Institute initially funded Fairchild’s travels, but after a few years, President William McKinley’s administration absorbed the project as part of the USDA.  We can thank David Fairchild each time we peel a banana, pop the pit out of an avocado or drink a beer.  Yes, he traveled to Germany, made friends with some of the men who guarded the fields of hops and managed to ‘steal’ some to bring back home!  Thank you!

I owned a big restaurant in the 1980s and I purchased cases of kale.  We didn’t eat it!  We used it to line our salad bar (the first salad bar our little college town had)!  For most of the 1900s, kale was primarily grown for decorative purposes, but finally in the 1990s, we began to eat it and by 2010, the kale trend had certainly blown up!  Kale salads; kale smoothies; kale chips.

David Fairchild found kale growing in Croatia. Food historians tell us that kale was growing along the Mediterranean 4,000 BC.  We know that the ways of cooking in the times of David Fairchild included stewing, so the earliest American cookbooks teach us to prepare it that way.  We know that kale was grown in European gardens because it was hearty.  It was a food needed during WWI because it was cheap to grow and was prolific.  We know it was a suggested crop for the Victory Gardens of WWII.  In my favorite vintage period of the 1950s and 60s, kale was being consumed in American households.  The recipes are scant and typically call for cooking the greens for a long time.  Scalloped Kale is a little different, in that it tops that over-cooked kale with a white sauce and finishes the casserole under the broiler. 

But today, kale is praised and consumed in the United States at a higher rate than it has been consumed in other countries.  In the Netherlands, kale is mixed with mashed potatoes and served with fried bacon or smoked sausage.  In Germany, it is served with bacon on sausages and is comfort food.  In Italy, kale is a popular ingredient in Ribollita soup. Caldo Verde is a popular Portuguese soup that combines pureed potatoes, chopped kale, olive oil and sliced spicy sausages.  In Ireland, it is often used instead of cabbage to make their popular combination of mashed potatoes and greens.  In Scotland, kale is so much a part of the daily diet, people who are too sick to eat are said to be “off one’s kail”.

I enjoy kale salads, but today I’m sharing a recipe for a creamy kale and pasta casserole.  It is layered and resembles a nice vege lasagna.  It makes a wonderful main course or served in smaller portions as a side for grilled meat.  It is also a year-round recipe.  I cook and freeze kale and I simply chop kale and freeze it raw.  It is so versatile.  Kale keeps in the fridge longer than most leafy greens, and I written many times that I eat it because my oncologist (22 years ago) told me to eat healthy … eat greens.  I changed my ways and changed the eating habits for my husband and daughter.


The first recipe I want to share with you is for homemade ricotta cheese.  My German grandmother made her own cottage cheese.  Her sister had a dairy farm and Grandma always had fresh milk and cream.  She had a cheesecloth bag that she filled and hung on a hook right over the kitchen sink.  I didn’t learn how to do this from my grandmother.  Instead, a sweet elderly Italian friend taught me.  You don’t need special equipment.  You don’t need cheese cloth to strain the cheese … just use a fine mesh sieve. 


Homemade Ricotta

½ gallon whole milk
½ cup lemon juice or vinegar

In a heavy saucepan, heat the milk to about 200 degrees.  Not to a boil, but hot.  Immediately pour in the vinegar.  Cider or white works.  Remove the pan from the burner and let it sit.  The vinegar will curdle the milk.  After the milk has cooled and curdled, drain it through the sieve.  You can use what your pour off.  It is good to bake with or to add to a casserole.  I seldom use it.

What I always do, however, is add 2 teaspoons of sugar to this cheese when I use it.  A half-gallon of milk will make 2 cups of cheese.  Most recipes call for that much.

You can replace ricotta with this homemade ricotta in sweet and savory recipes, but I still add the sugar!


This is oak leaf kale.  The leaves really are shaped like an oak leaf, and if you let the kale get a week past really fresh, the leaves will change colors to gold and red … just like fall leaves.  I love it more for that very reason!  It makes beautiful salads and is my favorite garnish used to line platters or  hors d’oeuvre  trays.  Think about your Thanksgiving turkey and how gorgeous it would be nested on a thick bed of these leaves!  They are pretty, but they are good, too!


Oak Leaf Kale and Pasta Casserole

This recipe is for 4 side servings or 2 main course servings.  It is easily doubled.

2 cups cooked kale, bite size pieces
1 cup ricotta cheese
1 egg
1 teaspoon sugar
2 cups cooked pasta (shells, elbows, any kind)

White sauce ingredients:
2 Tablespoons butter
2 Tablespoons flour
2 cups Half and Half
2 Tablespoons German beer mustard


Press the water from the cooked kale.  Prepare a casserole dish.  Mix the ricotta cheese, egg and sugar until it is smooth.  Drain the pasta well.

Prepare the white sauce by melting the butter and making a roux by stirring in the flour.  Add the Half and Half and let it cook until it thickens.  Stir the mustard in.  Any German style mustard works for this, but Dijon would be fine and natural grain mustard would be fine.

Begin the layers for the casserole with kale on the bottom.  Then add a thin layer of the white sauce.  Add the pasta and top it with the ricotta cheese mixture, so it thickens up the pasta layer.  Add another layer of kale, then finish it with white sauce.  Bake uncovered for 35 – 40 minutes.  The white sauce on top with brown and bubble.


Let the casserole cool 30 minutes before cutting and serving.  You can see that I garnished the top of mine with some of the kale leaves that I deliberately didn’t chop up …  and some red pepper pieces. 

This post is a part of my 2020 Vintage Vegetables project.  If you are interested in similar articles, just click the menu button.  I'll also be sharing with a couple blog parties and they are listed on my sidebar.   Enjoy!


Long and Skinny Cakes!


I’ve always loved to bake, and I’m good at it!  Now that I am retired, I’m baking more and doing my best to adjust recipes to keep my Diabetes in check.  I’m afraid the two cake recipes I’m sharing today didn’t get high scores on that account!


I have been looking at the thin layer cake pans for some time and finally decided to invest in some, so I didn’t have to mess with splitting layers of cakes.  In my book, Wilton products are always good, so I bought the set of 4 x 10 inch pans.  I don’t get paid for my recommendations, but I do recommend these!  The clean-up is easy and the thin layers bake in about 10 minutes.  One cake mix fills all 4 pans, so one normal cake recipe fills all 4.

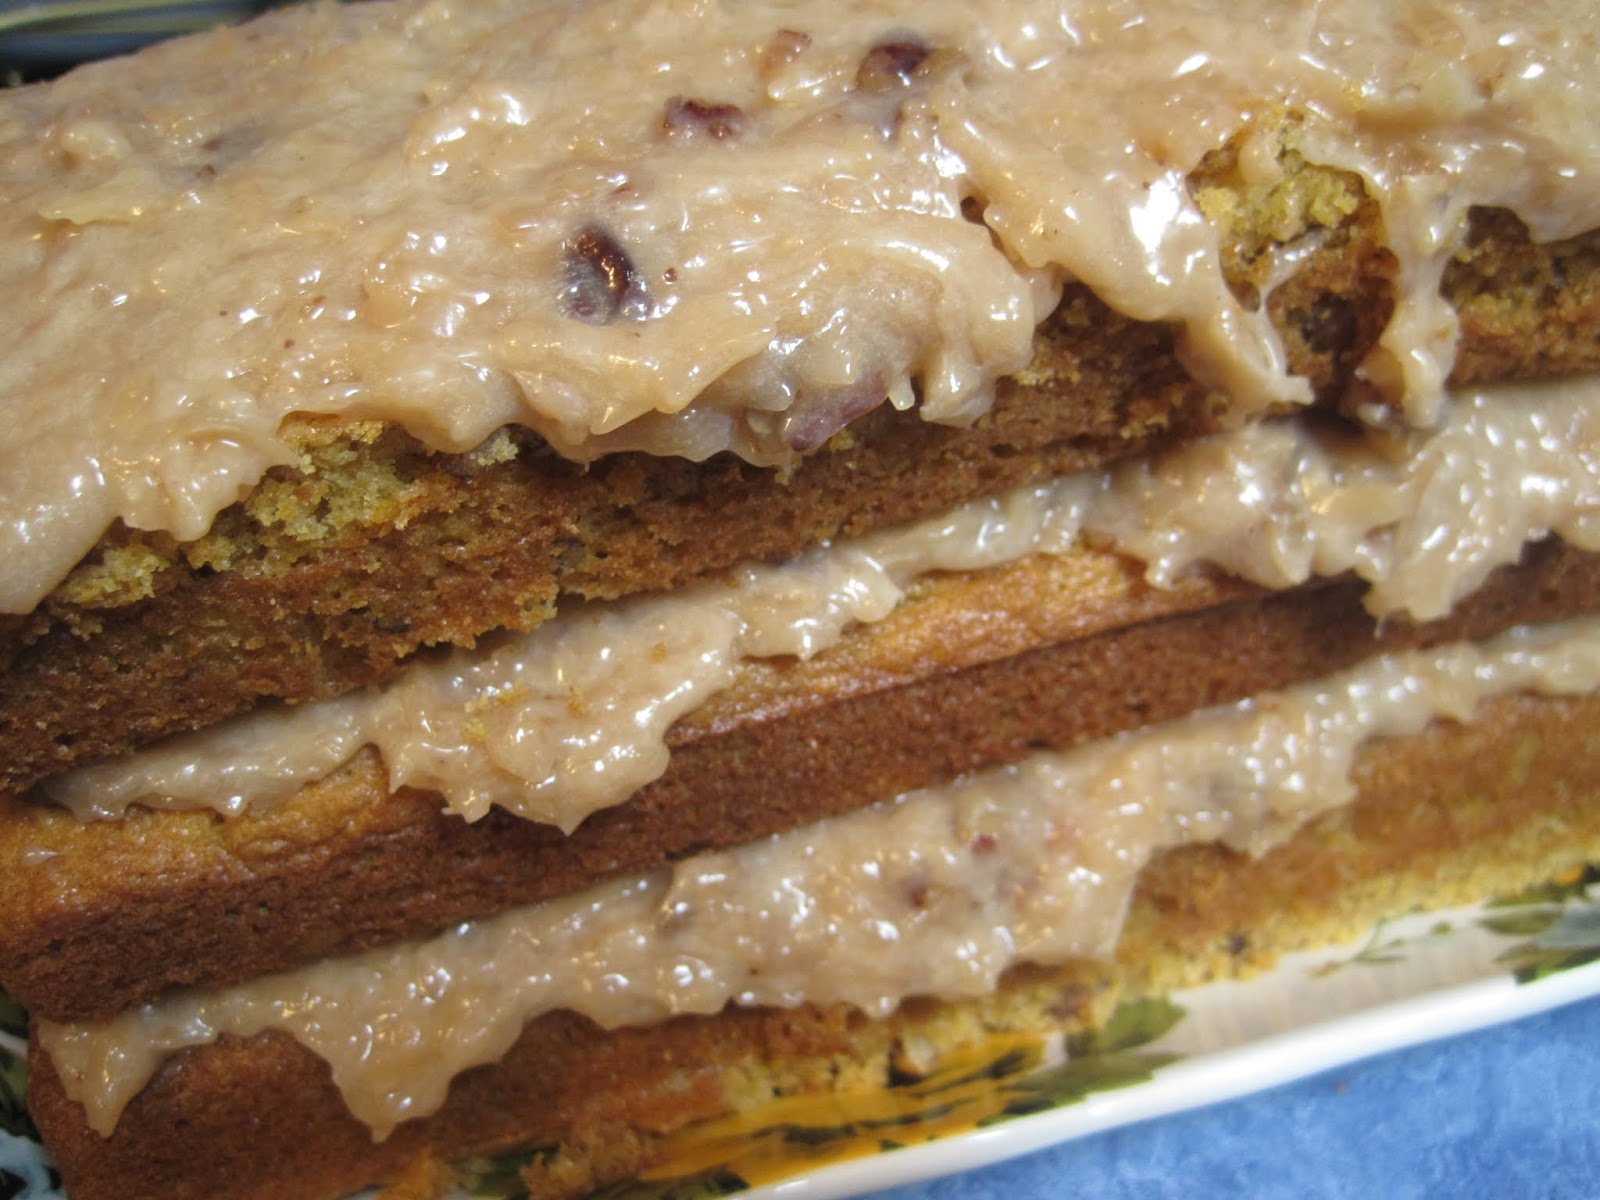
For years, I baked peanut butter cake totally from scratch until I tried it starting with a cake mix.  I hate to admit it, but my scratch recipe was never as moist as the recipe I use now.  I used to think everything had to be made from scratch … but I’ve changed my ways!  However, I don’t think any frosting is ever as good as homemade.  I’ve cheated on my second recipe today, but that isn’t very common in my kitchen!  My homemade sweet potato cake is topped with coconut pecan frosting right out of the little plastic container!

I hope you’ll try these pans. 


Peanut Butter Cake


1 boxed yellow cake mix
1 ¼ cups water
½ cup creamy peanut butter
1/3 cup vegetable oil
3 eggs

Just follow the directions on the cake mix, adding the peanut butter with all the other ingredients.  Bake the layers at 350 degrees, but for just about 10 minutes.  These layers are thin, so it doesn’t take as long.

Let the cake layers cool about ten minutes, then remove them from the pans.  You can use a parchment paper sling in each pan, but I found that non-stick spray was all that was needed.  Let the cake layers cool before frosting.


Peanut Butter Frosting

4 ounces of cream cheese, softened
4 ounces of butter, soft
½ cup creamy peanut butter
1 teaspoon almond extract
4 cups powdered sugar
2 Tablespoons milk

Cream together the cream cheese, butter and peanut butter.  Add the almond extract and blend it in.  Cup at a time, add the powdered sugar.  Add the milk a little at a time.  You might need more or less milk … just whip the frosting until it is the consistency you want.

This amount of frosting is enough to frost just the tops of the 4 layers.  If you were baking a round 2 layer cake, it would do the top and sides … but if you want to also frost the sides of the long 4 layer cake, you’ll need to make additional frosting.


The peanut butter frosting will soak into the layers of cake after standing overnight.  I really think the cake is better the second day, but it seldom lasts that long with my family!


Sweet Potato Cake

I bake large portions of sweet potatoes, peel them and put the potatoes in freezer bags and freeze them.  I use them in a variety of ways, and they were perfect for this recipe.  You can use canned sweet potatoes, but make sure you drain off all the liquid.  Of course, you can use a couple fresh potatoes that you baked and skinned.  The potatoes, however, need to be cold or at least room temperature for this recipe.


Sweet Potato Cake

2 sticks butter, soft
2 cups white sugar
3 eggs
1 Tablespoon vanilla extract
2 ½ cups mashed cooked sweet potatoes
1 cup buttermilk

2 ½ cups flour
2 teaspoons baking soda
2 teaspoons baking powder
½ teaspoon salt
1 Tablespoon cinnamon
½ cup chopped walnuts


Whip together the butter, sugar, eggs and vanilla extract.  When creamy, add the mashed sweet potatoes and blend together really well.

Sift together all the dry ingredients, then add them to the butter mixture … alternately with the milk … about a third at a time.  Fold in the nuts. You can substitute the cinnamon, or part of the cinnamon, with pumpkin pie spice or apple pie spice.   Nutmeg and ginger would be nice additions.

Whip the batter until well blended.  Pour the batter in the prepared layer pans.  Don’t over-fill the pans.  You might have a little extra batter for a couple cupcakes! 

Bake at 350 degrees for 10 – 15 minutes.  Remember, the layers are thin, so it doesn’t take as long as it would for regular layers.  If a pick comes out clean, your layers are done.  Let the layers cool for 30 minutes before inverting them to completely cool.

This cake would be wonderful with butter cream frosting, cream cheese frosting or even chocolate frosting.  I used pecan coconut frosting and the combination was scrumptious.   This cake was so heavy and dense, that I only used 3 of the 4 layers.  The 4th layer went in the freezer!

Knowing that, in the future I will only bake 3 layers and use the remaining batter for a 6-inch Bundt cake.

Simple Celery!


Is celery the vegetable that frequently ends up in the bottom of your refrigerator crisper, brown and limp? You aren’t alone! In fact, lots of my readers ask me for celery recipes so that doesn’t happen. I have plenty of recipes to share, but celery isn’t foodie sexy, so I fail to take pictures to share with you! I’m going to do better.

I like all the celery stalk, but I especially like the tender ribs in the middle of the stalk. I cook using celery, so I don’t have trouble consuming a stalk in a reasonable amount of time, and when I worry that I’ll have some go bad … I chop it up and throw it in the freezer. Admittedly, I usually buy celery hearts.

Celery is a member of the parsley family. From the works of Confucius, we learn that wild celery was in use in China before 500 B.C. Ancient Egyptians used the seeds as seasoning. Ancient Greeks use celery for medicinal purposes and both cultures believed it to be an aphrodisiac. It is not. The Greeks also used the stalks and leaves to weave victory wreaths for their sports heroes.


Tudor menus included celery and as unhealthy as Henry VIII was, he enjoyed salads loaded with numerous vegetables. I’ve started studying the history of the foods of Barcelona, Spain because of the mixture of cultures over the centuries. Celery was a part of 15th Century Barcelona cuisine.

Celery was cultivated in 16th Century gardens in Italy and in Northern European countries, but it was primarily used for medicinal purposes.

In the 17th Century, French and Italian gardens were filled with cultivated celery, but it was primarily grown for its root, not for the stalks. Finally, by the end of the century, the tender stalks and leaves were eaten with an oil based dressing. Gardeners realized that if they planted in late summer for fall harvesting, the bitterness was somewhat eliminated.

19th Century Americans grew celery, but still the most popular part of the plant was the root! It is found on menus of White House dinners, college events and restaurants of that era, but is was never really popular!

What has changed?  Not a lot! In my favorite vintage period of the 1950s and 60s, celery was stuffed with savory cheeses. It was creamed and braised in butter. Celery is an ingredient in much of what we cook! In 1981 Chef Paul Prudhomme coined the phrase “Holy Trinity” related to cuisine and the use of the combination of celery, onion and bell pepper in his popular recipes! A couple hundred years earlier, the term “mirepoix” that was a combination of celery, onion and carrots used in French cuisine ... was coined. The term was named after the Duke of Mirepoix who was associated with Louis XV but seems to have no other claim to fame!

We should probably just be content that celery flavors foods and that it is a great ingredient in various wonderful dishes from all around the world! Today I’m going to share a couple recipes with you that include celery as the primary ingredient. In the meantime, keeping adding it to your Thanksgiving crudité tray, salads, soups, stews and to your favorite Bloody Mary!


Let’s start with that tray of raw vegetables and dip that we like to present at summer BBQs and suppers. What can you do to make it eve more special? Take the time to make celery fans! All you have to do is use a sharp paring knife and cut strips in the end of the piece of celery. Put the pieces in water and refrigerate overnight. The celery slices will fan out and when you stuff them later … or just use them in a vege tray … they will add a little decorative touch. They also make a pretty garnish when plating food.

In my 1940s and 50s cookbooks, I find the same couple of recipes used over and over. However, I also find that both are delicious. One is simple. You just boil pieces of celery, drain them and then serve them with butter … salt and pepper. They are even better with a spritz of lemon juice or by using combinations of citrus salts or peppers. That’s easy enough!

The second popular celery recipe from my favorite vintage period follows.


Braised Celery 
2 onions, sliced
4 cups celery, cut in bite size chunks
4 Tablespoons melted butter
1 Tablespoon corn starch
2 cups vegetable or meat broth

Place the sliced onions in the bottom of an 8-inch square casserole dish. In a heavy skillet, brown the celery in the melted butter. This will require medium high heat. Dissolve the corn starch in the cold broth, then add it to the skillet and let it cook until it thickens. Pour this over the onions in the casserole and bake for about an hour at 325 degrees. While the recipe doesn’t include this, I usually add some crunch to the top of this casserole in the last ten minutes of baking. Use a cupful of crushed crackers, breadcrumbs, crushed potato chips … or the same onions you put on your green bean casserole.

Both these recipes are really good, but the following salad is one of my favorite celery sides. Strawberries are ripe in my neck of the woods right now, so the salad is extra good. You can make it year-round, though, if you can find strawberries in the supermarket! I’m going to share one of my secrets, too!


Celery and Strawberry Side Salad 

To serve 4 people, combine 4 cups of halved strawberries with 4 cups of celery hearts, chopped. No salt or pepper but use a honey-rose wine vinaigrette. One of the very few bottled salad dressings I buy is Brianna’s Homestyle Blush Vinaigrette. 


I keep it all the time and it is perfect for this simple side salad. If you want to make a homemade dressing, just combine 3 Tablespoons of rose wine, 3 Tablespoons of honey, 3 Tablespoons of avocado oil … a little salt and pepper … and you’ve got the perfect topper for this simple salad.


I’m posting this as a part of my 2020 Vintage Vegetables project. If you want to see similar columns, just click my menu tab. I’ll also be sharing this with a couple blog parties, so always check the list on my sidebar to visit those sites.

Stay safe. Stay well.


Rainbow Chard


I’ve written many times that if my dad didn’t like a certain vegetable, it didn’t grow in his gardens! Swiss chard certainly was on that list! It was not on the tables of my childhood! My German grandfather probably grew it. He grew spinach for Grandma, who loved to keep ‘stewing’ in the deep Dutch oven in her stove. 

Swiss Chard, especially Rainbow Chard, is really popular right now. It hasn’t always been popular in American cuisine, however. Chard has been named many things. Silverbeet, Leafbeet, Strawberry Spinach, Roman Kale are among those names. As a result, the history of Chard is difficult to trace, but it is believed to have originated in a wild version in the Mediterranean, specifically on the island of Sicily. Chard was first described in 1753 by Carl von Linné, a Swedish botanist, zoologist and physician. Carl von Linné spent years classifying and naming plants and it was he who added “Swiss” to the name of chard, in an effort to differentiate it from French Spinach. Prior to that time, chard was listed as Leaf Beet in the 1484-page History of Plants, published in 1597 by English botanist, John Gerard.

Food historians identify Silverbeet as having been prominent in household gardens in England and in America by the 1830s. In 1829, Baltimore physician and entomologist Gideon Smith, wrote of receiving Silverbeet seeds from England. Prior to the Civil War, horticulturist Robert Buist promoted the vegetable in Philadelphia. As a result of his promotions, it became popular in various eastern cities. After the Civil War, it became widely cultivated although still a “specialty” plant.

During the late 1800s, chefs prepared Swiss Chard by separating the rib from the leaves. They prepared the stem/rib like they prepared asparagus. The leaves were used just like spinach but were generally available in the summer months after spinach and kale had died out. Chard refoliates, so gardeners could have as long as a six month growing season. In my little bit of research, I found a few recipes for Chard in Civil War era cookbooks. My favorite was the combination of Corn Pone and Chard. The chard was prepared with “fat back”, which to some is a delicacy and to others is scrap meat! The chard leaves and stems were cooked in a broth created by browning the fat back.

In my favorite vintage era, Swiss Chard was cooked the same way it was cooked in the late 1800s! The long stems were separated from the leaves and the author noted that you could have two vegetables for two meals if you did that. The stems were braised then simmered and served with a cheese sauce. The leaves, if tender, were served raw as a salad. Otherwise, the leaves were prepared like cooked spinach.

I want to encourage you to grill Swiss Chard. The flavor is a little bit sweet, a little bit smokey and a little bit savory. It is so easy to do, and you can throw it on the grill each time you cook. I think it goes with everything! I’m also sharing a couple other recipes from the last time I prepared it this way.


Grilled Rainbow Chard 

Clean the chard by removing about a half inch of the bottom of the stem. Wash the leaves, then pat dry them with paper towels. Stack the leaves on paper towels until you are ready to grill them. Use a spray bottle of olive oil and spritz each leaf with oil. Add salt, pepper and a little garlic powder to each leaf. Place them on the grill over low to medium heat, oiled side against the grill. Let the oil cause a little smoke, then turn the leaves and continue to grill. Serve with vinegar and parmesan cheese. You can also serve with balsamic glaze.


Grilled Lemon Chicken 


6-8 pieces of chicken
¼ cup of olive oil
1 teaspoon garlic paste
1 cup lemon juice from 5 lemons
1 Tablespoon chopped fresh thyme leaves

Mix the olive oil, garlic, lemon juice and herbs and let this stand for a couple hours so the flavors meld.

Begin grilling the chicken pieces over medium high heat but be ready to move it to a cooler part of the grill in the event of flare-ups. You don’t want burned chicken, but a little smoky flare is a good thing! Grill the chicken for about 15 minutes for legs and wings and 20 minutes for breasts and thighs, turning at least 4 times during the cooking process. Keep the grill lid on during the cooking time. Remove the chicken pieces to a shallow pan and pour the olive oil lemon juice combination over the meat. Turn the chicken pieces so that the entire surface is exposed to the sauce. Return the chicken pieces to the grill but place it over low heat and let it cook for another 5 – 10 minutes, basting a few times with the remaining oil. Chicken breasts should be cooked to 165 degrees and thighs to 170 degrees. If you are using boneless chicken pieces, it will take a little less time and if you have extra-large bone-in pieces, it might take more time.


Warm French Potato Salad 

My mom came from a long line of German cooks, but I don’t remember her ever having made warm German potato salad! She sure liked it when I made it, though. One of my blogging friends recently emailed this recipe to me and I’m pretty sure that the only reason “French” is in the title is because of the inclusion of Dijon mustard in the recipe. However, this combination of herbs is frequently referred to as French fine herbs. It is good cold, but it is better warm and those little fingerling potatoes make better still!


2 pounds small fingerling potatoes
1 teaspoon sea salt
½ teaspoon black pepper
1 teaspoon garlic paste
2 Tablespoons white wine vinegar
2 Tablespoons Dijon mustard
¼ cup olive oil
1 shallot, minced
1 Tablespoon minced fresh chervil leaves
1 Tablespoon minced fresh parsley leaves
1 Tablespoon minced fresh chives
1 teaspoon minced fresh tarragon leaves

Boil the potatoes in 2 quarts of water for 8 - 10 minutes, until the tip of a knife can be easily inserted. Immediately pour the potatoes in a colander, draining them well, but reserve a cup of the boiling liquid. Cut each potato lengthwise in half and place them flesh side up in a shallow pan. Sprinkle with salt and pepper. Mix the reserved water with the olive oil, vinegar, mustard and garlic paste together and drizzle it over the potatoes. Let them stand for about 10 minutes, so the dressing soaks in a little. Then top them with shallot and herbs and toss them gently. Serve them warm or at room temperature. Set them in a warm oven to reheat or put them in a BBQ grill safe pan and place them on the hot grill to reheat.


This post is a part of my 2020 Vintage Vegetables project. I’ll also be sharing it on a couple blog parties, so make sure you check my side bar for that list. Click through for more partiers!


Spinach Lots of Ways!


Simple things make me happy!  I am delighted to live just 45 minutes from the birthplace of Elzie Segar, the creator of Popeye!  Chester, Illinois is the place!  1929 is the year that Popeye first appeared in one of Seger’s comic strips.  Spinach is the topic of today’s post.  We all know that Popeye’s strength came from spinach.  When I was a child, we could buy cans of spinach with the sailor’s picture on the label.  That didn’t make me like it!  Yuck.   My mother combined cooked spinach with her liver and onions menu.  I couldn’t stand any of it, but she was determined to make sure we got our iron!  Today I love liver and onions, and I love spinach … even out of the can!  To learn more about Segar, click right here.


Food historians believe that spinach originated 2000 years ago in Persia.  Then it was introduced to China via Nepal in 647 AD and was called the ‘Persian vegetable.”  In 827, Arabs introduced spinach to Sicily.  Spinach is first found in writing, recorded in 10th century Mediterranean works.  At the end of the 12th century, Spain was using spinach; a hundred years later it was known in Germany; and finally, spinach was introduced by Spain to England and France in the 14th century.  There is no wonder that we find spinach included in cuisine world-wide!   

It came to America with the earliest settlers and is found in an
American seed catalog published in 1806.  Spinach recipes are found in early American cookbooks … boiled, stewed, wilted.   By 1920, there are recipes for creamed versions of preparation.  In the 1940s, we start to see spinach layered with breadcrumbs … sometimes with broth … other times with cream … with lots of cheese.  It was also in the 40s when Americans began to enjoy crisp cooked spinach.  The still popular artichoke spinach dip became popular in the 1950s.  Baked sausage/spinach balls were also popular in the 50s, long before the packaged stuffing mix came out, and it reemerged in the 70s with the advent of the stuffing mix and the new recipe!  In 1960s and 70s we began to love eating it raw in salads.  Now, we drink it!  You can hide spinach in smoothies and fool the kids! 

I’m sharing a couple recipes today.  I have a grand daughter approved hot dip recipe, a bread maker recipe and shells stuffed with ricotta and spinach!


Hot Spinach and Artichoke Dip

Ingredients:
 
1 block of cream cheese
4 ounces Velveeta
4 ounces Queso Oaxaca
4 – 6 ounce jar of marinated artichoke pieces or hearts
2 cups fresh spinach, shredded
½ cup cream or canned milk
1 teaspoon onion powder
½ teaspoon pepper

I make this in a small crock pot.  Cut all the cheeses into small cubes.  Chop the artichoke pieces so they are bite size.  Shred the spinach.  Put all the ingredients into the crock pot.  Cook it on high for 2 hours, stirring it a few times.  Serve it with chips, toasted bread, quesadillas or fresh vegetables.  Refrigerate any that is left and reheat it in the oven or microwave.


Spinach Swiss Bread

Place the following ingredients into your bread machine in the following order.

1 cup warm water
2 Tablespoons canola oil
1 cup chopped fresh spinach
3 cups bread flour
½ cup shredded Swiss cheese
1 teaspoon salt
1 Tablespoon sugar
½ teaspoon pepper
2 ½ teaspoons active dry yeast.

Set the bread machine on the white loaf setting and turn it on.  When the bread is done, brush the top with butter.  It is scrumptious ... makes great sandwiches … and can be cut in fingers and toasted … and dipped in the hot Artichoke Spinach dip.


Spinach and Cheese Stuffed Pasta Shells

Pasta recipes are often very large.  I have designed this one to feed 4 people with a side serving of vegetables or a big salad … or to feed 2 people.

Ingredients

12 large pasta shells
1 ½ cups ricotta cheese
3 cups shredded fresh spinach
½ cup shredded parmesan cheese
1 egg
½ teaspoon pepper
½ teaspoon parsley flakes
1 teaspoon sugar
Small package of fresh mozzarella pearls
Jar of your favorite red sauce

Boil the pasta shells; drain them; run cold water over them to cool them.  Let them sit in cold water, so they don’t stick together


Prepare the filling by running hot tap water over the spinach to wilt it.  Drain it and squeeze the water out of it.  Doing this easy step makes it more pliable for the filling.  Mix the ricotta, parmesan, salt, pepper, parsley and spinach together.  Add an egg and mix it well.

Pour a little red sauce in the bottom of a medium sized baking dish.  Fill the shells and place them in the dish.  Stuff the mozzarella pearls on top of the filling in each shell.  The recipe will use just half a jar of sauce, so I pour it out into a measuring cup with spout.  I add a little sugar to any packaged red sauce to cut the tartness, but that is optional.  Pour the sauce around the shells … not on top of them … around them.  Cover with foil and bake at 350 degrees for about 30 minutes.  Remove the foil and continue to bake for 10 more minutes. 


This article is a part of my 2020 Vintage Vegetable Column.  To see similar posts, click my menu tab.

I'll be sharing this with a couple blog parties, so check out my sidebar list.


February's Family Sunday Dinner

Christmas 2020

Mary Queen of Scots Dinner Menu Booklet

Grandma Debbie's Christmas 2018

Grandma's Blue & Green Pupkins!

Autumn at Grandma Debbie's