market header

market header
Many of my upcoming blog posts will focus on foods I purchased during the Farmers Market season! I froze ingredients with plans to use them during the off-season months. I love adding that 'sunshine' to my cold weather menus!

Oyster Stew!

As I write this final post of my 2020 Vintage Vegetables project, I have to say that I’m proud of myself!  I stuck to it and will have written 52 blog posts about vintage foods, recipes and the times of my childhood.  If you’ve followed these posts, you might know more about my family than most people!  You will also have learned that I cook like my mother and my Aunt Evelyn cooked!  They were my mentors as a child and as an adult.  You’ve also learned that my dad and my husband had huge impacts on the food doings in our household!  When the men liked … we cooked!  I have a new food blogging project for 2021.  I’ll start those posts next weekend, so make sure you come back to see what I’m doing in the new year!

Now, on to the New Year!  My mother created a New Year’s Eve tradition after my older siblings had left home.  I am the baby child, so I had the life of the only child (at home anyway) for a few years!  Daddy loved oyster stew, so Mother started fixing it on New Year’s Eve!  In those days, my favorite vintage period of the 1950s and 60s, the only kinds of oysters we had in Southern Illinois came from a little can!  They were expensive, so it wasn’t something we had often, but when we had it, we certainly enjoyed it.

I’ll share the recipe today.  It is simple and isn’t something I really call stew because it is chock full of vegetables, but that is what Mother called it … so the name remains!

My daddy was a storyteller.  I have those genes and so does my daughter!  I’m happy about that!  He had a tendency to open up more around the holidays and talk about traditions and memories of his own childhood.  Occasionally, we’d hear stories about his time in WWII, stationed at Great Lakes in Chicago and then on Okinawa for months.  I delighted in sitting at the supper table, listening to him. 

Only one time did my dad tell the story of making oyster stew when he was on Okinawa.  He carried a small camp stove, a skillet and a coffee pot … so the notion of him cooking soup was very real.  I don’t know where he got oysters … maybe they were fresh … maybe he managed to find some in a can.  He clearly described using his powdered milk, though!  He loved whole milk … cow’s or goat’s … and he loved buttermilk.  Powdered milk was never his favorite thing, although most families kept a box of it for emergencies! 

Daddy also described his friendships with fellow soldiers.  I was thrilled when I found a little address book he used when he discharged.  In it were names and addresses of many men … written in their own handwriting.  I can just see my dad handing it to a friend and having them add the contact information.  I’m sure he stayed in contact with many … and I know he stayed in contact with a soldier friend in South Carolina until the day he died.  We always looked forward to letters and cards from South Carolina!

Daddy also talked about helping the locals raise their gardens.  He talked about sneaking food to the cabins of the Geisha girls who had been left on the island with no way to support themselves.  I’m not sure those girls were true Geishas, but that is what my dad called them.  I was a young teenager when he explained their purpose on the island and why the Japanese just left them behind after the American invasion of the island.  These stories about sharing food with people who needed it never surprised me because my dad did that his whole life!  Garden produce, big catches of  fish … were always shared!

In many ways, my childhood family lived the spirit of Christmas all year long!  There were many years when our own gifts from Santa were minimal, but if there was a family in the community that needed a meal … a box was anonymously left on their front porch. 

Times were simpler then.  In this year of 2020, we have gone back to many simple things because the pandemic has forced us to.  You might want to try my very simple oyster stew recipe before we end this year!  Maybe it will bring us all health and happiness in the next!


Simple Oyster Stew


1 can of oysters

1 quart of half and half (or whole milk)

3 scallions (or a little bit of a yellow or white onion)

1 stalk of celery

Lots of black pepper and fresh sage (or rubbed powdered sage)

Half a stick of butter

3 Tablespoons flour

Slowly melt the butter in a heavy pan.  Chop the onions and celery and sauté them in the butter until they are soft.  Add a couple leaves of sage (or 1/4 teaspoon of powdered) and a couple heavy dashes of black pepper.

Add the  flour and stir until it forms a light colored roux.  Add the half and half and continue to simmer until it begins to thicken.  Lastly, pour in the can of oysters with the juice and continue to heat until ready to serve.   Slowly heating this stew is the key to the best flavor.  You probably won’t want any salt in it as the oysters are typically salty!  Add it if you need it!


This is the final post of my 2020 Vintage Vegetables project.  If you’d like to see similar posts, just click through my menu tab.  I’ll be sharing with a couple blog parties, so check the list on my sidebar.  Happy New Year!


Oh, Christmas Tree!

Many of my Christmas traditions are carried over from my own childhood or from my husband’s childhood!  My antique ornament collection includes several small boxes of mercury painted glass ornaments from Joe’s mother’s collection, too.   I have to admit that I don’t use those anymore, but maybe next year, I’ll decorate a tree with those and with ornaments that my daughter made when she was a little girl.   We have a precious angel made from a man’s handkerchief that has another child’s name written in it!   I never could find the Sunday School mom that ended up with an angel with Nicole’s name in it, though … so we just always enjoyed the one we came home with!  We called it "Andi the Angel" because that is the name written inside it!

I have so many treasured items that I’ve received as gifts over the years, that I should just decorate the whole house and leave everything out (and up) all year long!  All those things matter, but the food traditions are the things that I love most.

Homemade eggnog … on every Christmas Eve for 45 years!   Homemade Irish Cream since some nurses (who were nuns) at Notre Dame gave their secret recipe to my husband!  Marshmallow cream fudge … chocolate, peanut butter and vanilla … was a welcome addition after watching my mom make it without the magic of marshmallow cream for my whole childhood!  Penuche made in a big cast iron skillet, using Mrs. Harrison’s recipe.  The Harrisons were like an extra set of grandparents for us.  They lived right across the street from us.   Fruitcake.  Yes, my husband and I loved fruitcake, so I baked it every year.


The most important food tradition on my list is a Christmas morning breakfast treat!  In 1974, a magazine had a picture of the cutest Christmas Tree made from cinnamon rolls.  Homemade cinnamon rolls were already one of my specialties, so shaping the Christmas Tree was an easy creation.  Sweet icing, maraschino cherry ornaments in red and green … and colored sugars to make a garland.  Needless to say, after the first year … this became a tradition.   When Nicole got married, her dad reminded her that she needed to carry on with that tradition and she has!

You can google this idea and find hundreds of recipes for the dough.  Shortcuts certainly include frozen bread dough or frozen cinnamon rolls.  Another shortcut is to simply use tubes of cinnamon rolls that bake in just a few minutes.  I’ve even seen this done with tubes of  crescent rolls spread with hazelnut chocolate and rolled up … then baked in a tree shape.  I’m going to share my refrigerator rolls recipe with you, so at least the longest part of the rising process will be done overnight in the fridge!

All you do with any of the risen dough you are using is roll it out into a rectangle that is about half an inch thick.  Brush it with melted butter, sprinkle generously with dark brown sugar and chopped nuts ... sprinkle with cinnamon!  Then you roll it up like a jelly roll, slice it in 1-inch pieces and place them in a prepared sheet pan.  Shape them like a tree!

I let them rest and rise a little more (up to an hour until they are about double the original size), then bake them at 375 degrees for 10 - 15 minutes or until they are starting to brown on the edges. 

Frost them with a simple combination of powdered sugar and a few drops of milk.  Flavored coffee creamer makes a good glaze, too … just use it instead of milk.

There are lots of ways to finish decorating the tree!  Sprinkle chocolate chips over the tree and place it back in the oven for just a few minutes until the chips melt.  Add more nuts to the tree or sprinkle it with any of the things you use to decorate cookies!  You can use peppermint candies, gum drops,  … anything that makes you happy!


Overnight Refrigerator Rolls 

When using this recipe for Christmas Tree Rolls, divide the dough in half roll it out and prepare for rolls.  You’ll be able to cut 10 – 12 rolls from each portion.


1 1/4 cups warm water (105 degrees F to 115 degrees F)
1 pkg or 2 1/4 tsp active dry yeast
1/3 cup sugar
4 to 4 1/4 cups all-purpose flour
1/3 cup vegetable oil
1 egg
1 tsp salt
2 Tbsp butter, melted

Dissolve the yeast in the warm water. Sprinkle with a little of the 1/3 cup sugar.


After the yeast starts to bubble a little, add in 1 1/2 cups of the flour, the rest of the sugar, oil, egg, and salt. Beat with an electric mixer ... I use my dough hook on my Kitchen Aid. Scrape down the sides and mix for five minutes until you have a sticky ball! 


Pour a little canola oil in a refrigerator container large enough to allow the dough to triple in size. Roll the ball of dough around to coat all sides with oil. Refrigerate overnight (or up to 3 days). 


When you are ready to use it, pour it out onto a floured surface and let it rest 15 minutes. Shape the dough into 24 balls - don't overwork the dough. Place into a greased pan 13 x 9 inch pan. You can use any size pans, really ... or place the rolls on a greased baking sheet with a couple inches space between them. 


Cover the rolls and place in a warm location ... Let them rise until double in size. This will take between 1 and 2 hours. 


Preheat oven to 375 degrees F. Bake for 12 to 15 minutes for individual rolls, about 20 minutes for pan rolls, or until golden. Immediately remove rolls from pans. If desired, brush tops of rolls with 2 tablespoons melted butter. Serve warm. Makes 2 dozen rolls.


This post is part of my 2020 Vintage Vegetable project!  If you want to see more, click the menu button!  Enjoy


Cookies for Christmas!


Last week, I smelled my mother’s perfume every single day. I think she was dropping in from her heavenly home. I kept getting the feeling that she was telling me to clean house and bake cookies!

When the term “God wink” became popular, I started calling those coincidental happenings “Mama winks” and “Daddy winks”! My Mama winks were very strong last week.

Needless to say, I didn’t clean house because I always avoid that. I did spend the day with my daughter and granddaughter, and we baked cookies. Lots of cookies.

Baking cookies is a big part of my Christmas food traditions. I cannot attribute that to my mother’s cookie baking skills, but I do have a wonderful story to share.


I was the last of five children. When I came along, Mother decided that she had time to be a ‘room mother’ for my kindergarten class. One of her childhood friends joined her and together, they planned some very special events. Mother saved her pennies and purchased a Mirro Cookie Press. It was a very popular thing in the 1950s and 60s … my favorite Vintage period! She bought it specifically to bake beautiful little cookies in special shapes for our school parties. The party I remember most was for Christmas. The cookie I remember most is the perfect little green Christmas Trees, covered with colorful sprinkles. I also vividly remember Mother making those cookies. Using that old Mirro press (which I inherited and still have) was not easy! The dough had to be perfect and the temperature of the kitchen and the baking sheet had to be perfect. I don’t think Mama used that contraption again … after her room mother duties! She was an expert pie baker. Cookies were not her specialty! 


My dad loved cookies and long after I left home, I would bake and take! In the fall, we always bought apples and a can of sorghum from one of the local orchards and delivered them to Daddy. One year, I baked a big batch of soft sorghum cookies. I’d never made them before, but when Daddy took a bite, he said, “Oh, those are just like my mama used to make.” My dad’s mother died when he was just 13, so that was truly a childhood memory for him. I continued to bake those cookies for him year after year!

The Christmas Cookie bakers of my childhood were really my Aunt Evelyn and her husband, Earl. She was my dad’s baby sister. He called her “Sissy” and so did we. Sissy and Earl lived in a two-story house with a kitchen upstairs and another kitchen downstairs.

One year, she and her friends decided they were going to bake cut-out cookies for people they called ‘shut-ins’. Sissy said we were going to have an assembly line cooking baking process every single day after school until we finished the baking … and decorating! I went to Sissy’s house every day after school for almost two weeks. We would congregate around the kitchen table in the basement kitchen. She would come down the stairs carrying a big, speckled granite roaster that was filled with cookies! Then the decorating began. Oh, my goodness! There were snowmen, Christmas trees, sleighs, round ornaments, gingerbread shapes of men and women, reindeer, Santa … and stars. I was partial to the stars because we got to use the glittery sprinkles on them! When I say that we decorated 500 cookies, I’m not exaggerating. I’m also not exaggerating when I say I probably ate a half dozen cookies each day! When we were all finished, we wrapped and packaged, and I got to help deliver cookies to old folks all over our little hometown. I was 11 years old that year. I have baked cut out Christmas cookies every year since. That, friends, is a lot of cookies!  That was a lesson of love that I learned at just the right age!

I’m happy to share my soft molasses cookie recipe today. I use sorghum and if you don’t have a good local farm market where you can buy it, I would recommend the Brer Rabbit brand.


Daddy’s Favorite Sorghum Molasses Cookies 

Whip these ingredients together until light and creamy:

1/3 cup of sugar
1/3 cup of brown sugar
1 stick of butter, room temperature
1 egg
1/2 cup sorghum molasses
1 teaspoon vanilla


Sift together and add to the creamed mixture:

2 ¼ cups flour
1 teaspoon baking soda
1/4 teaspoon salt
2 teaspoons cinnamon
2 teaspoons powdered ginger
1/2 teaspoon cloves
1/2 teaspoon allspice

Cream the dough until well blended. These cookies bake for 12 minutes at 350 degrees. You’ll need another half cup of granulated sugar to roll each cookie in. Roll balls of cookie dough (about the size of a walnut). Completely coat each ball in the sugar and place two inches apart on cookie sheets. As the cookies bake, they will spread out and crinkle. Let the cookies cool a couple minutes before removing from the baking sheets.


I borrowed this picture from food.com!

My Favorite Spritz Cookie! 

2 sticks of butter, room temperature
8 ounces of cream cheese, room temperature
1 cup granulated sugar
1 egg
1 teaspoon pure vanilla extract
2 1/2 cups all-purpose flour
1/4 teaspoon salt

I’ve made these cookies by the hundreds and I know that the best way to make the dough is to put all the ingredients in a food processer and blend it. No creaming ... no adding.  Put everything in at the same time and spin it!  It will form a ball in the processer.

This is my basic recipe, but I always drop a little green food coloring in for the Christmas trees and I love to use peppermint extract. A little drop of that will be enough!

Another tip – don’t spray your cookie sheet and make sure it is at room temperature … not hot from the oven. You want the ‘squirted’ cookies to stick to the cookie sheet or you won’t be able to lift the cookie shooter away from the cookie!   I don't usually have to refrigerate this dough, but if you think it is too soft, stick it in the freezer for a few minutes.

Follow the instructions that came with your cookie shooter. Bake these cookies for 12 – 15 minutes at 325 degrees. Watch the first batch closely and remove them when they are barely turning brown on the edges. Then you’ll know how long to bake the next batches!

We love to decorate our cookies will colorful sprinkles! Sprinkle the cookies before baking … or drizzle the baked cookies with a powdered sugar glaze and sprinkle over the wet glaze.


This post is a part of my 2020 Vintage Vegetable project! I’ll post with a couple blog parties, so make sure you check the list on my sidebar! Merry Christmas!

Apple Luncheon on the Deck!

 I'm posting pictures from a luncheon I hosted years ago.  It became part of a cookbook, so I never posted it on my blog.  You will, however, have seen my apples many times if you follow me.  It's part of my Tablescapes Series ... #11.  Enjoy the pictures!


Bless our Blooms!

I'm repurposing this post as part of my 2020 December Tablescapes Series.  Enjoy!


This cute summertime decor began with a gift from my brother and sister-in-law ... this cute wall hanging that is a window frame with chicken wire in place of the glass!  I loved the red geraniums ... and we all love our 'blooms' and our 'grand-blooms' ... so the sentiment was so sweet!  I decided to hang it on the brick wall of my sunroom.


Then, I got this cute 'sit' sign in the mail from my sister ... on her birthday ... she sent me a gift!  She bought it for my front porch after seeing my new red cushions.  If you missed that post click here to see it!   So, the sign found its way to the back porch sunroom!


I love the pots of geraniums ... and have it hanging over the liquor cabinet.

 It was easy to find lots of things in the house to move to the sunroom ... and red gingham checked ribbon around the candles was a must!


A candle jar filled with faux apples and an apple scented candle loves it place beside the red tool box filled with more silk geraniums.


...and didn't you know I'd have red geranium dinnerware to complete the scene?   The dinnerware is Metlox pottery, made in California ... probably from the late 70s.  The square bowls are Pfaltzgraff and the linens are Tina Vasi from Dillards.


Who wouldn't love the adorable coffee and tea pots?  The shapes are so unique and the geraniums are so detailed!


Hope you enjoyed one of what will be among the last bright summertime tablescapes!  It's almost time for pumpkins and fall foliage!


These pictures were never a part of a blog post because they were part of a newspaper cooking column.  Back in the day when I wrote columns, I tried not to duplicate in my posts.  I think a cheese tasting is a super fun thing to do ... especially if you add some wines and 
pair them with special cheeses!  Spend an afternoon or evening doing this so nobody gets too much!

This is #9 in my series of Tablescapes!  Enjoy!


Oranges for Christmas!

My Vintage Vegetable blog posts this December will all be related to
Christmas.  My early childhood memories of food around Christmastime will likely bring back memories for many of my readers … and will remind the young ones of the importance of remembering how things used to be … compared to how they are now.  Admittedly, 2020 has been a year that has taken many of us back to some of those old ways. 

Some of you probably remember the days when you could go to the grocery store and ‘sign’ for your groceries, running a tab and paying at the end of the month.  My mother never did that.  In fact, she never bought anything on credit and tried to teach her kids to be that thrifty.  (That was a lesson lost on this child!) 

What we did have at our little neighborhood grocery store was just the opposite of that.  Daddy would sell garden produce to the grocer in exchange for credit which could be used later.  Our ‘due bill’ was an amount due to us that we could spend against.  When I mention garden produce, I’m not talking about a few tomatoes!  Daddy exchanged bushels of sweet corn and a truck load of sweet potatoes one year. 

At another little store on the other side of my hometown, Daddy kept a different kind of running tab!  This store was attached to the Deal Brothers Blacksmith Shop.  The Deal Brothers were friends of Daddy’s, and they often swapped labor.  My dad was a carpenter and could build and/or fix anything.  Seriously.  By the time December rolled around each year, Daddy had some credit built up to use in the little tiny grocery store.  The Deal Brothers had relatives that lived in Georgia, so they always had plenty of pecans to sell during the holidays.  We loved our hickory nuts that we’d pick up in the woods and then work diligently to crack and pick out, but we more than loved those beautiful pecans.  The nut meats just fell out of the easily broken shell!   The Deal Brothers also had access to beautiful big oranges from Florida.  That’s where my post is going:  Oranges at Christmastime.

When I was a child, a Christmas treat at school and at church was a paper bag with an apple and an orange in it.  Sometimes there would be a few pieces of candy, too.  Twenty years later, when my daughter was a child, the school and church treat was the same.  Why oranges?  Apples were grown in big orchards in our region, but oranges came from ‘afar’! 

I always thought the tradition of giving an orange as a Christmas gift was related to the Great Depression.  Oranges were expensive, and to get one would have been an incredible treat.  While there is some truth to this notion, the tradition is actually based upon something done by the original Santa. 

Saint Nicholas of Myra lived during the 4th century in what we know as Turkey today.  Many celebrate his feast day on December 6th and in many countries, children receive special gifts on that day.  The orange tradition is linked to a story of Saint Nicholas rescuing three poverty stricken maidens who would have been forced into prostitution because they didn’t have a dowry.  Each of three nights, St. Nicholas tossed a gold ball (maybe a bag of coins) into the window of their home, saving their virtue.  Those balls are represented by our oranges, today.


 This altarpiece was painted in 1435 by Gentile da Fabriana and depicts this story

Putting an orange in the toe of a stocking hanging to  be filled the night before Christmas emerged in the 19th century and was probably due to the 1823 publishing  of “T’was the Night Before Christmas”!   Remember, he filled the stockings!  An orange was certainly less expensive than gold coins!  Oranges at Christmas fell out of vogue, but in 1908, the California Fruit Growers Exchange published many things encouraging people to put an orange in the toe of each Christmas stocking.  In 1931, colorful advertisements showed up like this one!  Santa could deliver cases of those pretty seedless navel oranges.

I think it is safe to say that some marketing men someplace put the orange back in Christmas … or maybe the gold back in Christmas.  By the time my favorite vintage period arrived … the 1950s and 60s, it was a popular stocking stuffer  again!  Nobody at my house waited until Christmas Eve for oranges!  I vividly remember my dad carrying in a big mesh bag, cinched at the top and filled with big juicy oranges!  That is a memory that repeats itself for several years. 

He  was still getting those oranges long after I was grown.  In fact, one year he had me fill stockings for all his grandkids with oranges and apples and tucked in the toe was a twenty dollar bill!  I remember their puzzled teenager looks at the notion that Grandma and Grandpa had given them fruit for Christmas!  Then they found the money and those expressions turned to laughter!
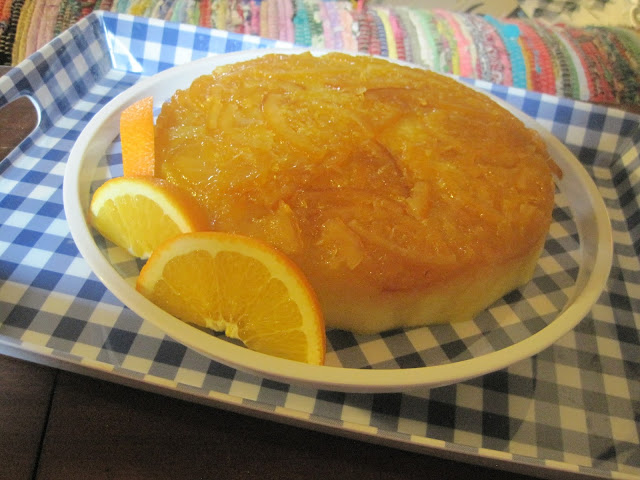
I found a wonderful recipe in one of my 1950s cookbooks published by the Culinary Institute of Chicago.  I’m baking this cake for the first time and sharing the recipe today.  I’m using orange marmalade that I made this summer.

Marmalade dates to the ancient Romans and Greeks.  Citrus was plentiful and cooking the flesh and some of the peel was easily thickened naturally by the pectin it contained.  We know that King Henry VIII received many gifts of marmalade  from Portugal and history tells us that it was a favorite of Anne Boleyn. 

The same Fruit Growers Exchange and marketing men who pushed the return of oranges to Christmas stockings, encouraged making or buying marmalade!


Orange Marmalade Upside Down Cake

Line an 8 inch cake pan or pie dish with parchment paper.  I cut my paper in a circle the same size as the bottom of my pie dish.  Spray the bottom of the pan first, then spray the sides and parchment with cooking spray to prevent sticking.  While the original recipe called for 8 Tablespoons of marmalade, I actually used a 14 ounce jar.  I think it needs more than 8 Tablespoons.   Simply spoon that all over the bottom of the dish … on top of the parchment paper.

Prepare the cake batter using these ingredients:

2 sticks of room temperature butter

1 cup sugar

3 eggs

1 ½ cups of flour

¾ cup of milk


Whip the butter and the sugar until glossy.  Add the eggs and continue beating until thick.  Alternately add the flour and the milk to the batter, continuing to beat.  The batter will be glossy.  Gently spoon the batter over the marmalade.

Place the cake dish in a larger pan of water to bake it.  The water should come up to about a third of the side of the dish.  Cover the whole thing with foil.

Bake this cake at 350 degrees for 1 hour and 15 minutes.  It essentially steams.


When done, remove the cake pan/pie dish from the larger pan of water and let it cool for fifteen minutes. Turn the cake out by placing a plate over the top and inverting quickly. Peel the parchment paper off the cake.

This cake is scrumptious.  The cake is light but rich and the marmalade is an incredible sweet topping.  If you bake a square, serve 9 pieces.  If you bake a round, cut it into 8 pieces. 


This recipe is part of my 2020 Vintage Vegetables Project.  I’ll be sharing the post with a couple parties, so check the list on my sidebar.  If you are interested in similar posts, just click my menu button.   Enjoy!

Magnolia Table for Christmas!

I'm repurposing this post as # 8 in the Slice of Pie Tablescapes Series!  This was really a photoshoot for a quarterly lifestyling magazine I used to publish.  I've added a couple pictures to the very end that I found in my files.  This is a beautiful table for any season, but especially at Christmastime!


I'm a Southern Girl ... Yes I am!

I love to set a Christmas Table with my old Magnola china!  Magnolia trees are prolific in Southern Illinois and I probably need to remind my readers that I live just 2.5 hours from Nashville and Memphis ... and 5.5 hours from Chicagoland!  Folks generally think "Chicago" when they hear Illinois!  We are the northern tip of the Mississippi River Delta ... and the history of our population is that folks migrated here from the Upland South.   So ... many of our foodways and other customs are southern-based!

Our annual Christmas Open House has a "Bayou" theme this year ... so my followers will eventually see a few mudbugs and at least one little alligator in my Christmas decor ... and my buffet meal will include Crawfish Pie, Jambalaya, Sweet Potato Pie and Pralines!  ... and Hurricanes and Chicory Coffee Punch! 


The pattern of this Monarch China is called "Brenda" and it is 1960s ... the stemmed glassware is a combination of a couple patterns from the 1940s ... and the silverplate is Oneida Community "Evening Star" from the 1950s.  I've amassed a collection of it over the years .. including "afternoon teaspoons" ... "grille forks and knives" ... individual butter knives ... and gumbo spoons!  Love it!


Blue Pumpkins for Birthday Dinner!


I'm repurposing this post as # 7 in the Slice of Pie Tablescapes Series!  I'm posting this series during December, but not all the tablescapes are for Christmastime.  Tuck these ideas away for next fall ... or at my house we love pumpkins all year round!  

Enjoy!


My daughter had a birthday and Miss Phoebe had a day off school that we spent together! Phoebe and I fixed a nice dinner and decorated a pretty table. We've been making all kinds of things this fall ... including blue pumpkins! I hope you've cooked some of the real blue pumpkins. They have a unique flavor ... a little sweeter that our typical orange pumpkins.


Here are the pumpkins we used on the table. They were simple to make ... just made a tube of fabric ... cinched one end and gathered the other end. I stuffed mine with the contents of an old bed pillow ... pulled the gathering threads to a tight cinch and sewed the end to secure it. My stem is a cinnamon stick; my leaves are burlap with the edges pulled ... and we added a button flower for good looks! We used twine to create the rib sections of the pumpkins, then tied the ends in knots. Aren't they cute?


We added several sections of these pretty blue satin leaves to our composed centerpiece. I bought lots of the leaves at my favorite local museum 'general store' and you'll see them again as Thanksgiving draws near! Then you'll see the a third time at Christmastime! 


Here's our centerpiece!


Here's our tablescape!


In keeping with our farm setting ... I used our blue geese napkin rings. We all love our dogs and had Labradors for several years, so we have Lab flatware and a set of Lab dinnerware that I'll show you another time!


This dinnerware is the pattern "Heartland".  The beautiful designs are by Charles Wysocki and the dinnerware was produced by Nikko.

What I love most about it is the fact that there are four seasonal depictions. This one is "Autumn".


Our birthday dinner was great and Miss Phoebe helped cook and decorate the cake ... and set the table! I have a great son-in-law, who just plays along with all our tablescaping ventures! ...as long as we feed him!


February's Family Sunday Dinner

Christmas 2020

Mary Queen of Scots Dinner Menu Booklet

Grandma Debbie's Christmas 2018

Grandma's Blue & Green Pupkins!

Autumn at Grandma Debbie's