Apple Festival on my Table!


In my little hometown, the annual Apple Festival should have been 69 years old this year.  COVID prevented it, but the community still celebrated in a virtual kind of way!  I joined in by setting a festival tablescape and fixing some great food.  Because I'm from an apple kind of town ... I have lots of apple themed dishes and decor.


If you follow me, you know that I compose centerpieces or endpieces using things I have. Sometimes, I add fresh flowers or plants, but usually everything comes from shopping the house!

I think my favorite part of this centerpiece is the little green screen door! When I was a kid, my great uncle had a screen door that looked just like this one! It was even painted green, which was a common front porch color!


Just like my centerpiece, my place settings are composed of may things I've collected over time!  I've loved apples for as long as I can remember, so I've added lots of apple things to my collections!


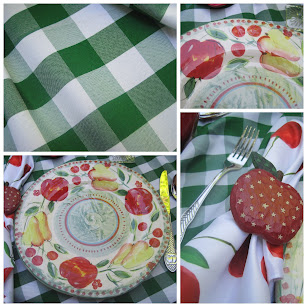
The apple soup bowl and the large ceramic apple in the centerpiece are from Tara's Temptations collection.  I love them!  The apple mugs came from Walmart ten years ago!  The flatware is new and came from Ginny's this year.  The plates are called "Festival" and showcase apples, pears and cherries!  The stemmed glasses are 1940s pressed glass, the red handled fruit knives have been used at my tables for years and the little apple shaped plates came from a shop in Pigeon Forge, Tennessee at least ten years ago!


These are my favorite parts of the tablescape!  I love the screen door ... love the checked tablecloth and the checked pattern on the leaf of the napkin ring.  The flatware is perfect for this table!

I'll share this post with a couple blog parties, so make sure you click through the listings on my side bar.

If you'd like to see my post for apple-icious foods, 

Click Right Here!

Apple Love!


If you know about Adam and Eve, you know of the significance of the apple tree in the Garden of Eden!  Just how long ago was that?

Food historians agree that apples grew in prehistoric times and that they were cultivated from a very early time.  Wild apples grew long, long ago.   Carbonized apples dating to 6500 BC have been found in Anatolia.  Those remnants appear to have been dried for eating.  Historians know that apples were grown in Mesopotamia and in Egypt.  Ramesses II had apple trees planted in his gardens in the 13th Century BC. 

According to C. Anne Wilson’s Food and Drink in Britain, Romans introduced apple tree to England.  The wealthy had harvested apples spread out in rows in a ventilated loft in order to store them.  They cut the apples with a bone knife, so the fruit wouldn’t be stained by metal knives.  By Tudor times in England, there were several varieties of apples and they were widely used in pies and tarts.

Peregrine White was the first child of English parents born in America’s Mayflower settlement as the ship still sat in the harbor.  When he was 28 years old, he planted an apple orchard, but there were already many growing in the area.  A hundred fifty years later, our beloved Johnny Appleseed (John Chapman) was growing apples.  We believe he traveled through Pennsylvania, Ohio and parts of Indiana to teach others how to start their own orchards.

Who doesn’t love apple pie?  It is an American staple.  Apple Pie originated in England and there is a written recipe dated 1381, which includes apples, figs, raisins, pears … all in a pastry shell.  It does not include sugar.

Then there is a Dutch Apple Pie that dates to the 1600s in the Netherlands.  In addition to the apples, it includes lemon and cinnamon and sometimes raisins and icing on the top of the crust.

In the 1880s, hotel owner Stephanie Tatin created Tarte Tatin in France.    A typical apple pie became something very special.  Halved apples were caramelized atop a puff pastry.

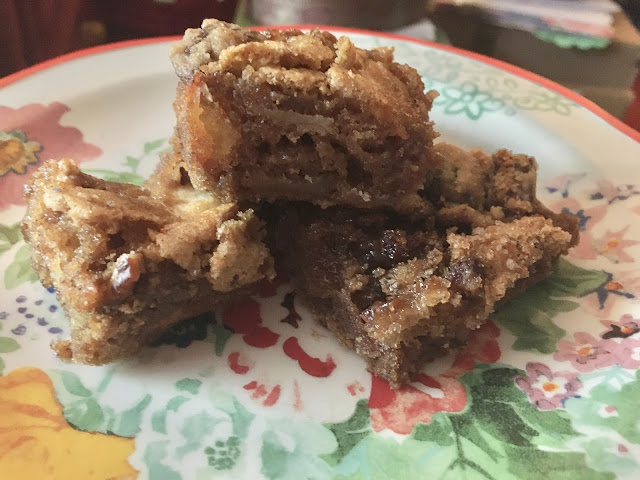
During my childhood, apple pies and apple cobblers were very much a part of our autumn menu!  Those are not what I most fondly remember, though.  My mother made two things that I make over and over again.  Mother’s Fresh Apple Cake was a family favorite when we were kids and it remains one of my favorites. 

When mother lost her cognizant abilities because of Alzheimer’s, I continued to make her Red Hot Candied Apples for my daddy.  Lots of families have memories of those at Christmastime, but in our household, we started making them in September and continued until the apples ran out!  These are probably my favorite apple treat that my mama made!

I don’t know that I’ve ever seen a recipe for this ‘candied apples’, but I sure know how to make them!  Start with a peck of your favorite apples.  Peel, core and quarter the apples.  Put the apples in a big pot with about 2 inches of water and bring that water to a boil.  There is no need to totally cover the apples.  Boil your pot for 2 or 3 minutes, then turn it to a simmer for another couple of minutes.  Put a lid on the pot and remove it from the burner. 


To flavor the apples with candy red hot
s, go back to the end of the boil stage and pour 6 to 12 ounces of the candies into the apples.  You can add a cup of sugar at this point, but I don’t.  As the apples simmer for the next couple minutes, the candy will dissolve, and the apples will turn red!  They are delicious.


To flavor the apples with a syrup, (like the bottled Savannah syrups), pour 1 to 2 cups of the syrup into the simmering pot just before the end of cooking.  The more flavor you want, the more syrup you add.  You can also use any brand of flavored syrups for coffee in this recipe!  This flavor was praline!

The apples are delicious warm or at room temperature but refrigerate them and eat them for several days.


Mother’s Fresh Apple Cake

2 eggs
1 cup of canola oil 
1 cup sugar 
2 teaspoons vanilla

Mix all these ingredients together and add 2 cups of flour, 2 teaspoons of cinnamon, 2 teaspoons of nutmeg, a teaspoon of baking soda and ½ teaspoon of salt.

Blend all this together to make a very thick batter.  Now, add 4 cups of peeled, cored and chopped apples and 1 cup of chopped pecans or walnuts.   Pour the thick batter into a 13 x 9 baking dish or your favorite shaped pan.  Use wet fingers to push the batter down so it is even.  Bake at 350 degrees for approximately 50 minutes.

You can cut this recipe in half and bake in an 8 x 8 inch pan.  You can bake the small version in an air fryer in a small springform pan.  These small versions take about 30 minutes at 350 degrees. 


This cake is perfect for snacking.  It is beautiful baked in a shaped Bundt pan and served with a topping of caramel sauce and ice cream.   A little whipped cream on a square from a sheet cake is wonderful … and a simple sprinkle of powdered sugar is great. 


If you'd like to see an apple tablescape

Click Right Here!


This post is part of my 2020 Vintage Vegetable project.  Of course, this is part of the “other old stuff” category!  I’ll be sharing with a couple blog parties, so make sure you visit the list on my sidebar. 

Autumn has arrived in my corner of the university and I’m thrilled to have a reason to bake and enjoy my love for apples!

1950s Popular Foods!


I recently ran across an article about the 30 most popular foods of the 1950s!  I thought that would be a perfect piece for me to research.  Out of the 30 foods, only 4 were popular in my home!  Glazed ham was for a holiday, but we had it.  Meatloaf was on my father’s hate list, but we had it too!  Deviled eggs were time consuming to make, but we had them!   Pineapple upside down cake, however, was a favorite in my childhood home and today I plan to tell you more!

Pineapple upside down cake is an important part of my adult home, too.  In fact, it is the reason I have an adult home!  Mama taught me how to make her one-egg yellow cake when I was about 12 years old.  For the upside down cake, we substituted the milk ingredient with juice from the can of pineapple.  Our upside down cakes were delicious. 

Many years later, when Joe and I were dating I made a Pineapple Upside Down cake for him.  I took it to his house, warm from the oven, in the cast iron skillet that had been used for this purpose for 30 years.  I turned it out for him, and I could immediately tell it was one of his favorites!  I cut a piece for him and we went to the tv room so he could become totally engrossed in a football game.  He hardly said a word to me other than to thank me for the cake and tell me how good it was.

He made me mad, so I took my cake and went back home.  A couple hours later he called me to see where I had put his cake!   I had made my point.   We married a few months later and for our lifetime together, I was never replaced by a football game again!  He enjoyed many Pineapple Upside Down cakes!

Pineapple was originally from Brazil and Paraguay but by the time European explorers arrived, it had spread all over South America and into Mexico and the West Indies.  The Spanish named the fruit because it resembled a pinecone, but because it was fruit, the two words pine and apple were combined.  Some believe that Columbus actually named it.

One of Jamestown’s original settlers attempted to cultivate pineapple.  The climate was right.  However, the shape of the pineapple had already become one of the most prevalent symbols of hospitality in England.  Planters, finials and bed posts portrayed pineapples.  Stone, wood and porcelain pineapples were everywhere in England, so as America grew, the symbol was commonplace.  It wasn’t until cargo ships coming from the Caribbean frequented the eastern seaboard that actual pineapples were a part of the diet in early America.

In 1790, Captain James Cook introduced the pineapple in Hawaii.  During the 19th Century the fruit was still very uncommon to Americans.  It was being grown in Florida at the time, but finally in the 1880s it was heavily cultivated in Hawaii and steamships carried it to our west coast.  In 1903, James Dole began canning pineapple in Hawaii and soon after, it had become a major industry.

Food historians know that Pineapple Upside Down cake appeared in the first half of the 20th Century.  But when?  There is a Seattle fundraising cookbook from the 1920s that includes a recipe.  Ladies’ magazines from the same decade include recipes for the cake.  Dole Pineapple invited women to submit recipes using pineapple and 2,500 recipes for  upside down cakes were sent in. 

In my favorite vintage period, Americans started visiting Hawaii.  Vacationers came back home and recreated luaus and made all kinds of foods using pineapple.  The famous cake emerged as one of the most popular recipes. 


Now it is time for the truth.  I make lots of Pineapple  Upside Down cakes, but I no longer bake the cake from scratch.  Betty Crocker and Duncan Hines both make a delicious box mix.  The trick to a delicious cake is to replace the water in the box instructions with pineapple juice from the can.


If you don’t bake your cake in a cast iron skillet, it is best to use a ceramic or glass casserole dish.  You can bake in a 13 x 9 inch dish, but I use an extra heavy weight jelly roll pan that is 15 x 10 inches. I like a thin cake … the cake is about the same thickness as the pineapple and the brown sugar topping.   When the cake is done baking, let it cool for 30 minutes before turning it out.   The trick to a perfect turn, is to make sure the edges of the cake are loosened from the side of the pan/dish … then place your platter or tray right over the pan … put one hand on the bottom of the baking pan and one hand on the top (holding the tray tightly against the pan) and invert! 

Another trick to ‘delicious’ is to pour a stick of melted butter in the bottom of the baking dish.  Sprinkle 1 ½ to 2 cups of dark brown sugar evenly over the butter.  Lay the rings of pineapple and maraschino cherries on top of the butter/brown sugar.    Gently pour the cake batter into the dish and make sure it covers everything, too.

Bake according to the package directions.  


This cake is a triple batch!  One of two baked for a dinner event for 50 people!  It took 3 people to turn it over!


This post is a part of my 2020 Vintage Vegetables project.  It is considered ‘other stuff’, of course!  If you’d like to see similar posts, just click the menu tab.  I’ll also be sharing with a couple blog parties, so check out my sidebar to see my party list.

Little Corn Chips!

When I was a child during my favorite vintage period … the 1950s and 60s … potato chips were an every-Friday-night treat at our house.  They were served just once a week with pan fried hamburgers that were deliciously prepared in a big cast iron skillet.  Catsup, mustard, sliced onions and pickles were always part of the treat, and in season wonderful sliced Big Boy tomatoes right from Daddy’s garden were heaped on a platter.  

We were also treated with a little container of Prairie Farms French Onion dip.  Prairie Farms was and still is a prominent Dairy in my neck of the woods.  Their French Onion dip is still on my grocery list!

One of my favorite memories of this meal surrounds a visit from my older sister’s boyfriend (she married him!).  At a table filled with four hungry kids, he set the dip container right beside his plate and proceeded to dip each of his chips right into the container.  I was six years old and I not so politely told him that at our house we were not allowed to ‘eat out of the bowls’!  We weren’t and what he was doing was disgusting to me, even at that young age!

At some point, Fritos Corn Chips were added to our Friday night menu!  I loved them and for me, they didn’t require dip!   The Frito Kid was all over television commercials and later the Frito Bandito arrived on the scene!  The promotions for Fritos included lots of recipes on the package and in my aunt’s magazines!  Still, at our house it was just another chip!

Fritos were invented by C. E. Doolin.  Doolin was a follower of Dr. Herbert Shelton … who was a health educator, pacifist and vegetarian.  He was an advocate of cures brought about by fasting.  Shelton promoted some of the natural hygiene ideas that originated in the 1830s.  Doolin was so impressed by Shelton’s teachings that he donated $50,000 in 1959 to build a training facility. 

Charles Elmer Doolin was a foodie!  In the 1930s he operated a confectionary in San Antonio, Texas.  A confectionary is a shop that sells chocolates and other sweet things.  Doolin decided that he needed a salty corn snack available to his customers!  Think how popular chocolate and salt is today!  I think he might have been a man ahead of his times!  I’m glad!

While traveling, Doolin met a Mexican man in a gas station.  He was frying little corn chips he made using masa.  These ‘little fried things’ soon became Fritos and Fritos became a popular household word!  That was in 1932! 

Doolin and his family were vegetarians and corn chips fit their menu!  He would get chips at his factory before they were salted because the family didn’t consume salt.  His wife developed recipes for using Fritos and I plan to share a few of those today!  In 1961, Doolin’s Frito Company merged with the Lays Potato Chip Company.  Frito-Lay was born and marketing exploded for the little corn chips!  

FRITOS BRAND is a trademark and brand of Frito-Lay North America, Inc.


My favorite way to eat Fritos is on top of chili or chili mac!


This recipe is really unusual, but it is important to remember that Doolin’s family believed in purging and fasting as a remedy for health issues.  These ingredients might have something to do with that notion!

Fritos Prune Whip

1 cup prune pulp
1 teaspoon lemon juice
½ cup heavy cream
¼ cup powdered sugar
Dash of salt
¼ cup crushed Fritos

Whip the cream until stiff.  Add the sugar and salt.  Add the lemon juice to the prune pulp and fold it into the cream.  Chill and served with crushed Fritos on top. 


This was promoted as a Halloween refreshment!  It is a little more standard and sounds appealing!


Fritos Chicken Breasts

Cut the breast of a boiled hen into four servings.

Wrap each portion with a piece of bacon and secure it with a toothpick.

Dip in milk and egg and roll in crushed Fritos. Fry until golden brown.


Fritos Veal Roll

¾ cup Fritos
2 ½ slices of bread
2 Tablespoons chopped onion
3 Tablespoons chopped celery
¼ cup stock
½ teaspoon poultry seasoning
1 egg
1 teaspoon baking powder
¼ teaspoon salt

Soften bread in water.  Add remaining ingredients and mix well.  Salt and pepper the steak.  Place 2 cup of the dressing in the center, spread over steak and roll.  Tie with string.  Place in casserole and add ½ cup of water.  Cover and bake for 1 ½ hours at 325 degrees.  Bake remaining dressing in a greased pan to serve as a garnish.


At first glance, I thought this was a chocolate brownie!  Not!

Fritos Potato Brownie

6 medium baked potatoes
½ cup hot milk
2 Tablespoons butter
1 teaspoon salt
¼ teaspoon pepper
¼ teaspoon paprika
½ cup crushed Fritos

Cut the potatoes in half and remove the centers.  Mash and combine with other ingredients.  Beat until light then fill the potato shells.  Top with the Fritos and place in 350 degree oven until hot.  Serve with a  cheese sauce.


1950s Hostess Dip

8 oz cream cheese, room temperature
3 tbsp milk
2 tsp lemon juice
1 tsp Worcestershire sauce
1 tbsp mayonnaise
1 tsp horseradish mustard
¾ tsp garlic salt
½ tsp paprika

Whip all the ingredients together and serve with Fritos!


This post is a part of my 2020 Vintage Vegetables project.  Click the menu tab to see similar posts.  I'm also sharing this with a couple blog parties, so take a look at the list on my side bar and hop on over to see all the partiers!


Casseroles thru Time!


I could probably write 5,000 words about the history of casseroles! I promise, I won’t! It is likely that casseroles of a sort are prehistoric. Some of the first writings about such creations are from Father Bernardino de Sahagun, a Spanish Franciscan friar who spent over 50 years in “New Spain” … Mexico. He arrived in Mexico in 1529 and did many things. He translated much of the Bible into the language of the Aztec. He studied their culture and the changes being made by the Spanish. He wrote the General History of the Things of New Spain and in it he described casseroles made with everything from tadpoles to large ants! Their casseroles included chilis, tomatoes and squash. From fish to fowl, they created what the Europeans would have called casseroles at a later time.

During Medieval Times, pies were similar to casseroles. Their contents were wrapped in thick pie crusts often called coffins. The word casserole entered the English language in 1708. Other cultures had their own forms of casseroles. In Morocco, the tagine was and is both the name container and the combination of ingredients.

The word casserole actually comes from the old French word casse. According to the Oxford Companion to Food, casserole cookery was popular in rural homes where a fire was burning all day and could be used for slow and long cooking methods. For years, casseroles were developed by the English and the French. Rice was molded into the shape of a dish and filled with a savory meat mixture. Later, borders of rice or mashed potatoes were placed on dishes of fricassee or curry. By the end of the 1800s, the word came to describe a meat dish combined with vegetables and stock. The word was actually used as a verb, but in her 1930 book, Strong Poison, Dorothy Sayers said, “It seems a shame to casserole a chicken when it would have roasted beautifully.” Casseroles during the Great Depression and certainly during wartimes were created to stretch foods or to use leftovers in a creative way. The notion of placing a whole roasted chicken on the table seems most unlikely to me!


During my favorite vintage period, the 1950s and 60s, casseroles hit the top of the popularity list! In the 1950s, glassware companies began make delightful oven-proof pieces for casseroles. It was also during this time that simmer pots and crock pots emerged in a variety of shapes and sizes. Women had left the kitchen and gone to work, so easily prepared one-dish meals were featured in all the magazines of the time. Casseroles weren’t fancy, but they were perfect for the busy homemaker.

There are zillions of casserole recipes online. If you have an ingredient you need to use up, google it and you’ll find a casserole recipe for it. I’m going to share a couple of my favorites today, and they are easy!


Spinach & Chicken Enchiladas 

1 cup sour cream 
1 cup green salsa 
1 roasted red sweet pepper 
2 cups chopped cooked chicken 
8 ounces shredded Monterey Jack Cheese 
10 ounce package of corn tortillas 
Several big fresh spinach leaves 

Mix the sour cream and the salsa and spread a third of it on the bottom of a 2 quart baking dish. Place a layer of corn tortillas on top of that and add another layer of 1/3 of the sour cream mixture on top of the tortillas. Place a layer of the spinach leaves on top of that; add half the chopped chicken and 1/3 of the shredded cheese. Drop in portions of the red pepper. Repeat these steps, starting another layer of tortillas. Finally top the casserole dish with tortillas; cover it with foil and bake it for 50 minutes at 350 degrees. Remove the foil and top the casserole with the last 1/3 of the cheese; return it to the oven for 5 more minutes to melt and brown the cheese. This makes 8 to 12 portions and can be served with additional green salsa, Spanish rice and a green salad. Garnish with additional red pepper chunks. Since this is a layered casserole, it is perfect for a potluck dinner.


This is about the easiest thing going! I used to do a lot of weekend cooking and freeze things for the upcoming week. This casserole is perfect for that. 


Beef and Mushroom Casserole 

1 pound ground beef 
12 ounces pasta 
1 can of mushrooms or 12 ounces of fresh 
½ cup chopped onion 
1 can cream of mushroom soup 
1 cup of milk 
1 cup of sour cream or cottage cheese 
1 cup shredded cheddar or jack cheese 
1 cup frozen corn kernels 

Cook the pasta and drain it. Brown the ground beef and the chopped onion until the beef is done. If you want to use fresh mushrooms, slice them and cook them along with the beef. In a big bowl, combine all the ingredients. Pour this into a large casserole dish; cover with foil and bake at 350 degrees for 40 minutes. You can divide this into smaller casseroles. Adjust the baking time.


This has always been a favorite family supper. It is so easy to stir together on a busy week-night or as a Sunday supper. 


Beans and Franks Casserole 

2 cans pork and beans 
¼ cup brown sugar 
¼ cup catsup 
1 Tablespoon mustard 
2 Tablespoons Worcestershire sauce 
A couple dashes of liquid smoke 
A drop of Kitchen Bouquet 
2 Tablespoons of minced dried onion 

12 package of cocktail wieners or hot dogs 
1 package of Jiffy cornbread mix 

Stir together the first eight ingredients on the list! You’ve made a short version of baked beans! Put these in a 13 x 9 inch casserole dish. Add the wieners to the top of the beans. If you use hotdogs, you can cut them in pieces or leave them whole. Mix the cornbread according to the package directions and drop the batter over the hotdogs and beans. You can sprinkle the top with shredded cheddar if you’d like. Bake at 350 degrees for 30 – 40 minutes … until the cornbread is browned, and the beans are bubbling. Serve it with a salad or a relish tray! It’s good!


Every time I make this, I remember a little restaurant in a small shopping center in our town … that was named The Wagon Wheel. They served a casserole that was more like chili mac and it, of course, included wagon wheel pasta. My version is the easiest Italian casserole ever! 


Wagon Wheel Pasta 

12 ounces wagon wheel pasta 
1 pound of ground beef or Italian sausage 
½ cup chopped onion 
½ cup chopped green or red bell pepper 
1 jar of prepared spaghetti sauce (at least 24 ounces) 
2 cups shredded mozzarella cheese 
1 cup grated parmesan cheese 

Boil and drain the pasta. Brown the ground beef or sausage with the onion and bell pepper until the meat is done. Let the meat cool slightly, then mix the pasta, meat and spaghetti sauce together. Make a couple layers of this in a 13 x 9 casserole dish and put the mozzarella cheese on top of each layer. Finish the casserole with the parmesan cheese (the kind in the green box) on top. Cover with foil and bake at 350 degrees for 30 minutes. Take the foil off and bake another 10 minutes so the cheeses brown. All you need is a nice salad … and maybe a ‘hunk’ of garlic bread … and you have a fantastic easy meal!


This post is a part of my 2020 Vintage Vegetable project. If you want to see similar posts, just click the menu button. I’ll also be sharing with a couple blog parties, so check out my sidebar.

February's Family Sunday Dinner

Christmas 2020

Mary Queen of Scots Dinner Menu Booklet

Grandma Debbie's Christmas 2018

Grandma's Blue & Green Pupkins!

Autumn at Grandma Debbie's